Mayastor User Reference
version/2.5
version/2.5
  • Welcome to Mayastor!
  • Scope
  • Basic Architecture
  • Quickstart
    • Prerequisites
    • Preparing the Cluster
    • Deploy Mayastor
    • Configure Mayastor
      • Storage Class Parameters
    • Deploy a Test Application
  • Advanced Operations
    • Mayastor Kubectl Plugin
    • High Availability
    • Replica Rebuilds
    • Supportability
    • Monitoring
    • Node Cordon
    • Node Drain
    • Volume Snapshots
    • Volume Restore from Snapshot
  • Additional Information
    • Upgrade
      • Legacy Upgrade Support
    • Tips and Tricks
    • Performance Tips
    • I/O Path Description
    • Replica Operations
    • Call-home Metrics
    • Tested Third Party Software
    • Migrate etcd
    • Scale etcd
    • Migration for Replicated DB
      • Backup from cStor
      • Restore to Mayastor
    • Migration for Distributed DB
      • Backup from cStor
      • Restore to Mayastor
  • Platform Support
    • Mayastor Installation on MicroK8s
  • Troubleshooting
    • Basic Troubleshooting
    • Known Limitations
    • Known Issues
    • FAQs
Powered by GitBook
On this page
  • Step 1: Backup from cStor Cluster
  • Step 2: Install Velero
  • Step 3: Data Validation
  • Step 4: Take Velero Backup
  • Opt-In for Primary MongoDB Pod:
  • Opt-Out for Secondary MongoDB Pods and PVCs:
  • Backup Execution:
  • Backup Verification:

Was this helpful?

Export as PDF
  1. Additional Information
  2. Migration for Replicated DB

Backup from cStor

PreviousMigration for Replicated DBNextRestore to Mayastor

Last updated 10 months ago

Was this helpful?

This website/page will be End-of-life (EOL) after 31 August 2024. We recommend you to visit for the latest Mayastor documentation (v2.6 and above).

Mayastor is now also referred to as OpenEBS Replicated PV Mayastor.

If you are deploying databases using operators, you need to find a way to actively modify the entire deployment through the operator. This ensures that you control and manage changes effectively within the operator-driven database deployment.

Step 1: Backup from cStor Cluster

Currently, we have a cStor cluster as the source, with a clustered MongoDB running as a StatefulSet using cStor volumes.

kubectl get pods
NAME                            READY   STATUS    RESTARTS   AGE
mongo-client-758ddd54cc-h2gwl   1/1     Running   0          47m
mongod-0                        1/1     Running   0          47m
mongod-1                        1/1     Running   0          44m
mongod-2                        1/1     Running   0          42m
ycsb-775fc86c4b-kj5vv           1/1     Running   0          47m
kubectl get pvc
NAME                                        STATUS   VOLUME                                     CAPACITY   ACCESS MODES   STORAGECLASS     AGE
mongodb-persistent-storage-claim-mongod-0   Bound    pvc-cb115a0b-07f4-4912-b686-e160e8a0690d   3Gi        RWO            cstor-csi-disk   54m
mongodb-persistent-storage-claim-mongod-1   Bound    pvc-c9214764-7670-4cda-87e3-82f0bc59d8c7   3Gi        RWO            cstor-csi-disk   52m
mongodb-persistent-storage-claim-mongod-2   Bound    pvc-fc1f7ed7-d99e-40c7-a9b7-8d6244403a3e   3Gi        RWO            cstor-csi-disk   50m
kubectl get cvc -n openebs
NAME                                       CAPACITY   STATUS   AGE
pvc-c9214764-7670-4cda-87e3-82f0bc59d8c7   3Gi        Bound    53m
pvc-cb115a0b-07f4-4912-b686-e160e8a0690d   3Gi        Bound    55m
pvc-fc1f7ed7-d99e-40c7-a9b7-8d6244403a3e   3Gi        Bound    50m

Step 2: Install Velero

For the prerequisites, refer to the section.

Run the following command to install Velero:

velero install --use-node-agent --provider gcp --plugins velero/velero-plugin-for-gcp:v1.6.0 --bucket velero-backup-datacore --secret-file ./credentials-velero --uploader-type restic
[Installation progress output]

Verify the Velero namespace for Node Agent and Velero pods:

kubectl get pods -n velero
NAME                      READY   STATUS    RESTARTS   AGE
node-agent-cwkrn          1/1     Running   0          43s
node-agent-qg6hd          1/1     Running   0          43s
node-agent-v6xbk          1/1     Running   0          43s
velero-56c45f5c64-4hzn7   1/1     Running   0          43s

Step 3: Data Validation

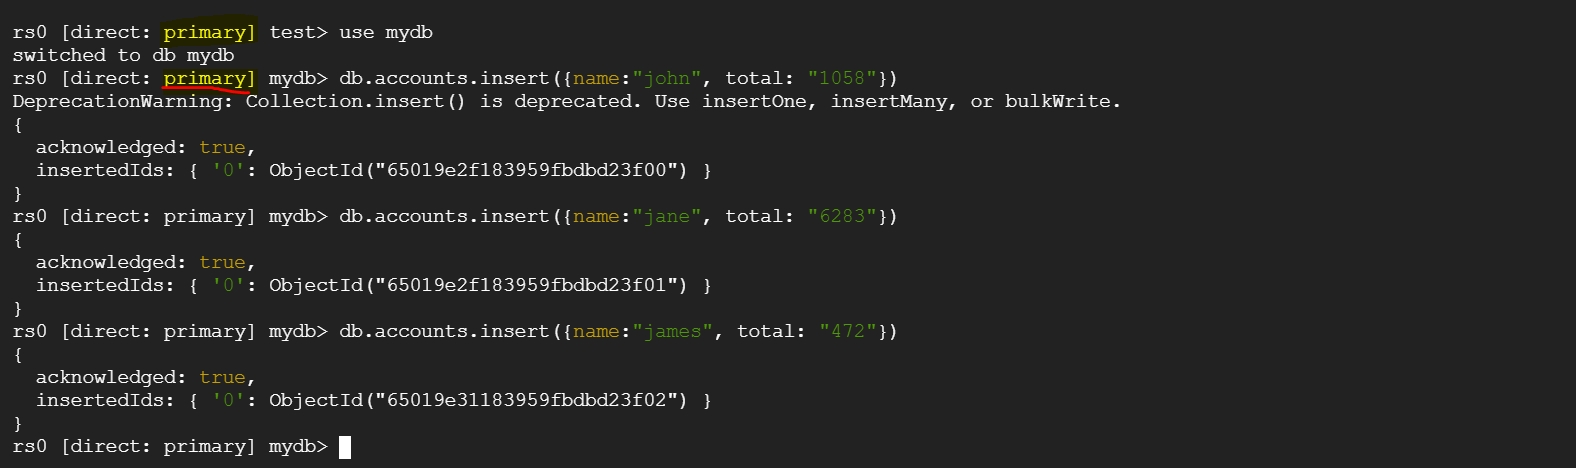
On the Primary Database (mongo-0) you can see some sample data.

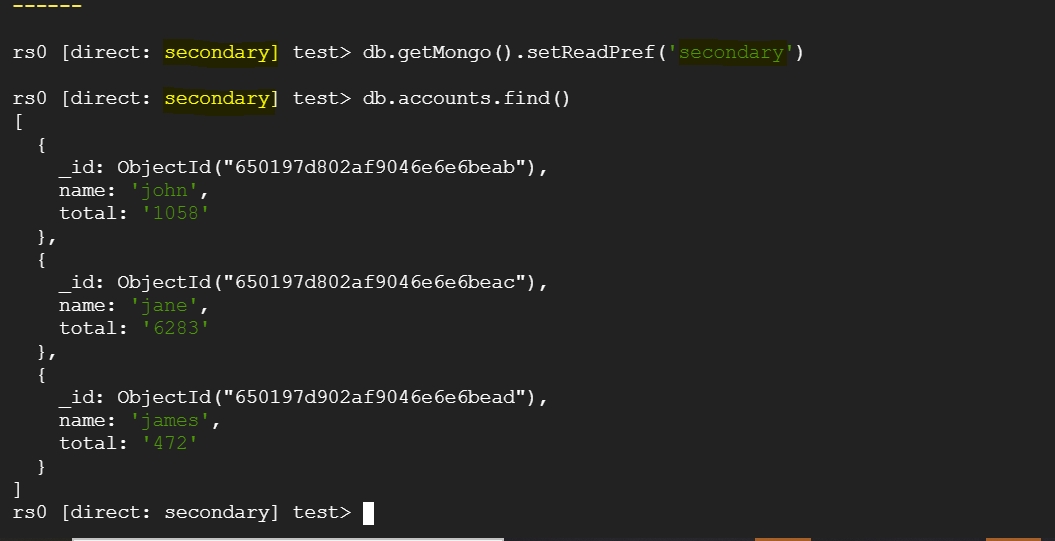
You can also see the data available on the replicated secondary databases.

Step 4: Take Velero Backup

MongoDB uses replication, and data partitioning (sharding) for high availability and scalability. Taking a backup of the primary database is enough as the data gets replicated to the secondary databases. Restoring both primary and secondary at the same time can cause data corruption.

Velero supports two approaches for discovering pod volumes to be backed up using FSB:

  1. Opt-in approach: Annotate pods containing volumes to be backed up.

  2. Opt-out approach: Backup all pod volumes with the ability to opt-out specific volumes.

Opt-In for Primary MongoDB Pod:

To ensure that our primary MongoDB pod, which receives writes and replicates data to secondary pods, is included in the backup, we need to annotate it as follows:

kubectl annotate pod/mongod-0 backup.velero.io/backup-volumes=mongodb-persistent-storage-claim

Opt-Out for Secondary MongoDB Pods and PVCs:

To exclude secondary MongoDB pods and their associated Persistent Volume Claims (PVCs) from the backup, we can label them as follows:

kubectl label pod mongod-1 velero.io/exclude-from-backup=true
pod/mongod-1 labeled
kubectl label pod mongod-2 velero.io/exclude-from-backup=true
pod/mongod-2 labeled
kubectl label pvc mongodb-persistent-storage-claim-mongod-1 velero.io/exclude-from-backup=true
persistentvolumeclaim/mongodb-persistent-storage-claim-mongod-1 labeled
kubectl label pvc mongodb-persistent-storage-claim-mongod-2 velero.io/exclude-from-backup=true
persistentvolumeclaim/mongodb-persistent-storage-claim-mongod-2 labeled

Backup Execution:

Create a backup of the entire namespace. If any other applications run in the same namespace as MongoDB, we can exclude them from the backup using labels or flags from the Velero CLI:

velero backup create mongo-backup-13-09-23 --include-namespaces default --default-volumes-to-fs-backup --wait
Backup request "mongo-backup-13-09-23" submitted successfully.
Waiting for backup to complete. You may safely press ctrl-c to stop waiting - your backup will continue in the background.
...........
Backup completed with status: Completed. You may check for more information using the commands `velero backup describe mongo-backup-13-09-23` and `velero backup logs mongo-backup-13-09-23`.

Backup Verification:

To check the status of the backup using the Velero CLI, you can use the following command. If the backup fails for any reason, you can inspect the logs with the velero backup logs command:

velero get backup | grep 13-09-23
mongo-backup-13-09-23     Completed   0        0          2023-09-13 13:15:32 +0000 UTC   29d       default            <none>

For reference:

OpenEBS Documentation
overview
MongoDB Backup and Restore Error Using Velero