Loading...
Loading...
Loading...
Loading...
Loading...
Loading...
Loading...
Loading...
Loading...
Loading...
Loading...
Loading...
Loading...
Loading...
Loading...
Loading...
Loading...
Loading...
Loading...
Loading...
Loading...
Loading...
Loading...
Loading...
Loading...
Loading...
Loading...
Loading...
Loading...
Loading...
Loading...
Loading...
Loading...
Loading...
Loading...
Loading...
Loading...
Loading...
Loading...
This website/page will be End-of-life (EOL) after 31 August 2024. We recommend you to visit OpenEBS Documentation for the latest Mayastor documentation (v2.6 and above).
Mayastor is now also referred to as OpenEBS Replicated PV Mayastor.
By default, Mayastor allows the creation of three etcd members. If you wish to increase the number of etcd replicas, you will encounter an error. However, you can make the necessary configuration changes discussed in this guide to make it work.
StatefulSets are Kubernetes resources designed for managing stateful applications. They provide stable network identities and persistent storage for pods. StatefulSets ensure ordered deployment and scaling, support persistent volume claims, and manage the state of applications. They are commonly used for databases, messaging systems, and distributed file systems. Here's how StatefulSets function:
For a StatefulSet with N replicas, when pods are deployed, they are created sequentially in order from {0..N-1}.
When pods are deleted, they are terminated in reverse order from {N-1..0}.
Before a scaling operation is applied to a pod, all of its predecessors must be running and ready.
Before a pod is terminated, all of its successors must be completely shut down.
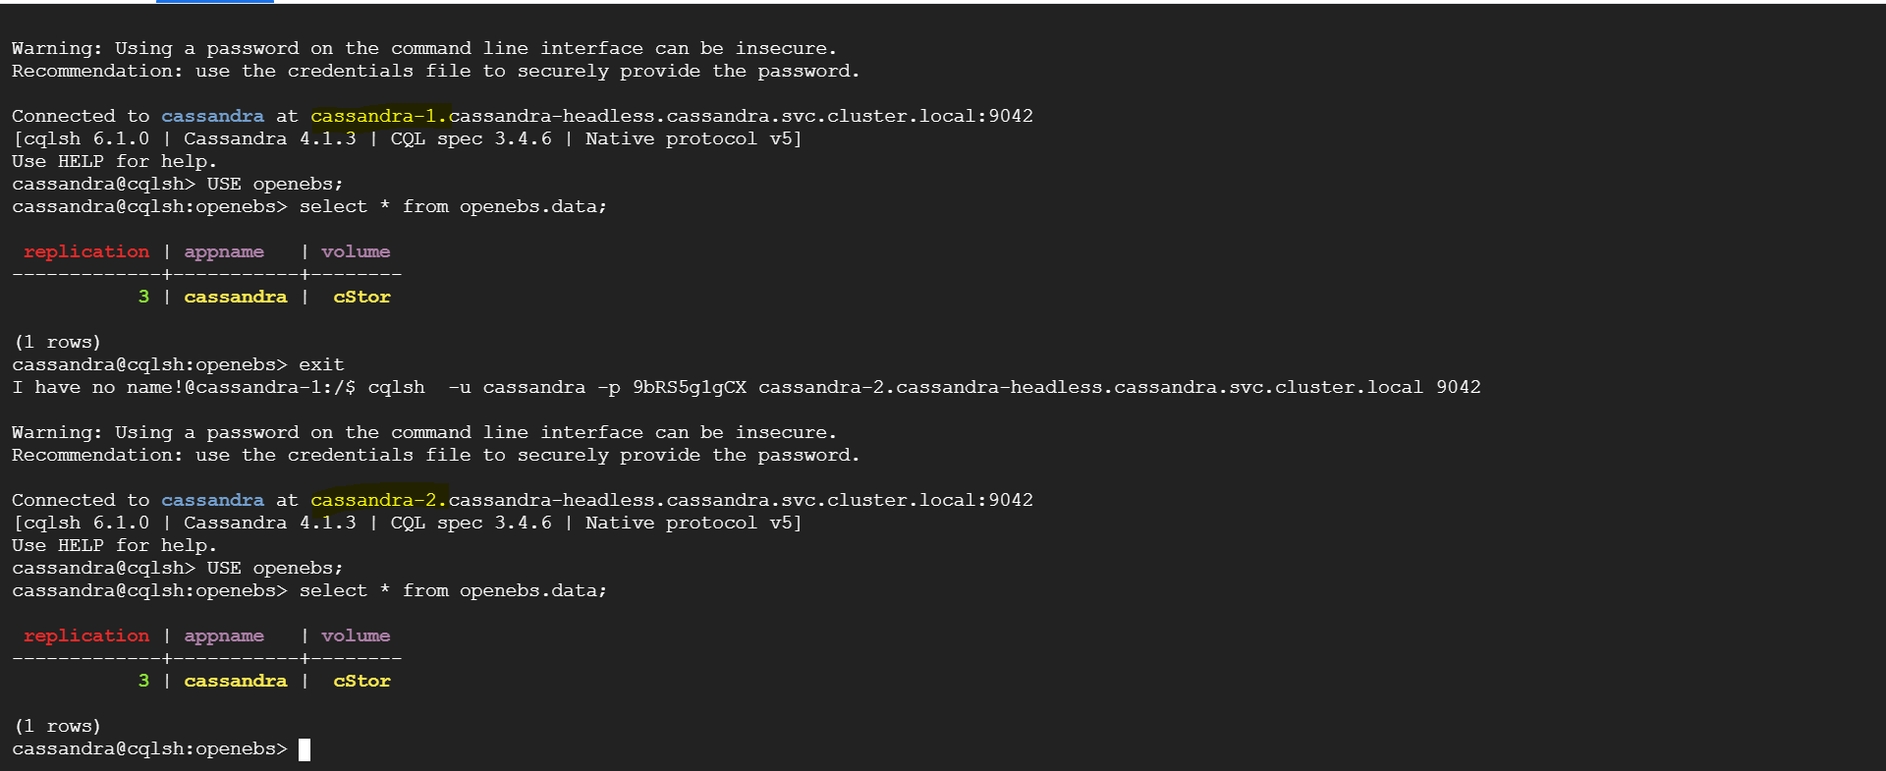
From etcd-0/1/2, we can see that all the values are registered in the database. Once we scale up etcd with "n" replicas, all the key-value pairs should be available across all the pods.
To scale up the etcd members, the following steps can be performed:
Add a new etcd member
Add a peer URL
Create a PV (Persistent Volume)
Validate key-value pairs
To increase the number of replicas to 4, use the following kubectl scale command:
The new pod will be created on available nodes but will be in a pending state as there is no PV/PVC created to bind the volumes.
Before creating a PV, we need to add the new peer URL (mayastor-etcd-3=http://mayastor-etcd-3.mayastor-etcd-headless.mayastor.svc.cluster.local:2380) and change the cluster's initial state from "new" to "existing" so that the new member will be added to the existing cluster when the pod comes up after creating the PV. Since the new pod is still in a pending state, the changes will not be applied to the other pods as they will be restarted in reverse order from {N-1..0}. It is expected that all of its predecessors must be running and ready.
Create a PV with the following YAML. Change the pod name/claim name based on the pod's unique identity.
Run the following command from the new etcd pod and ensure that the values are the same as those in etcd-0/1/2. Otherwise, it indicates a data loss issue.
Mayastor uses etcd database for persisting configuration and state information. Etcd is setup as a Kubernetes StatefulSet when Mayastor is installed.
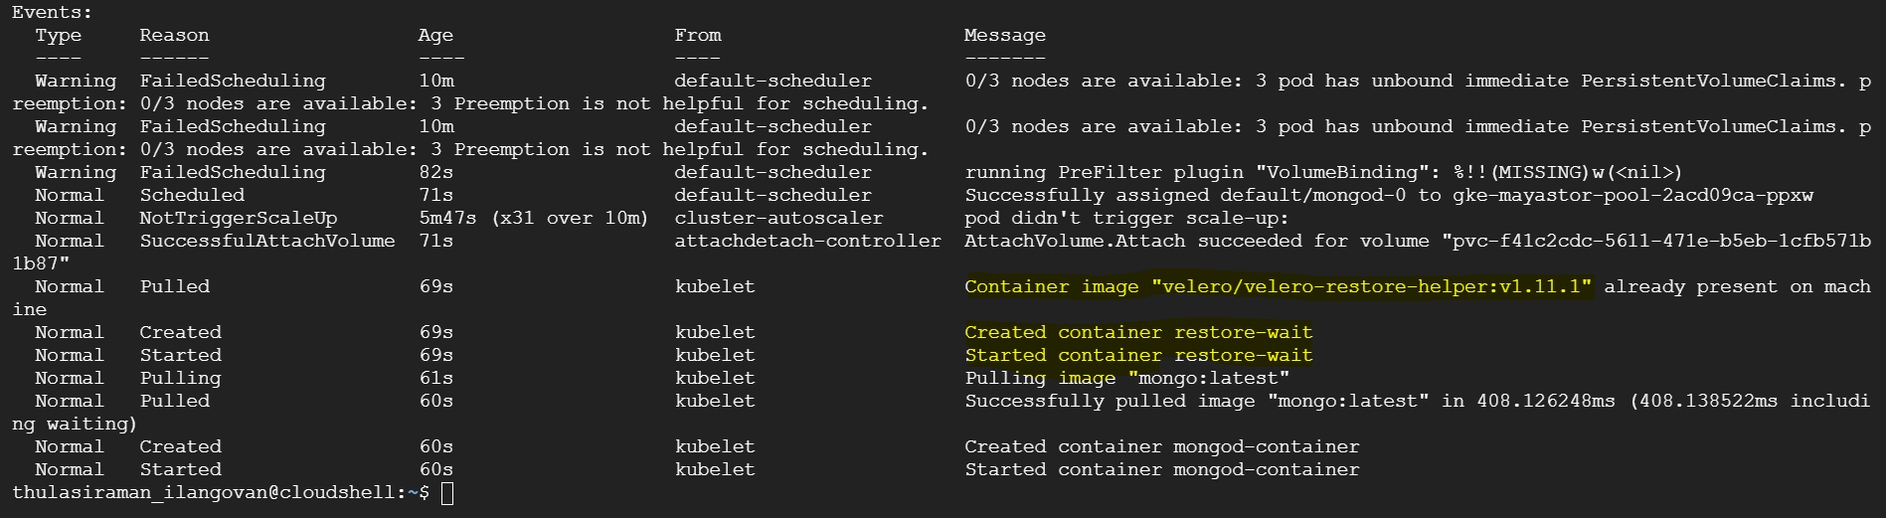
kubectl get dsp -n mayastorNAME NODE STATE POOL_STATUS CAPACITY USED AVAILABLE
pool-0 worker-0 Online Online 374710730752 22561161216 352149569536
pool-1 worker-1 Online Online 374710730752 21487419392 353223311360
pool-2 worker-2 Online Online 374710730752 21793603584 352917127168kubectl scale sts mayastor-etcd -n mayastor --replicas=4statefulset.apps/mayastor-etcd scaledkubectl get pods -n mayastor -l app=etcdNAME READY STATUS RESTARTS AGE
mayastor-etcd-0 1/1 Running 0 28d
mayastor-etcd-1 1/1 Running 0 28d
mayastor-etcd-2 1/1 Running 0 28d
mayastor-etcd-3 0/1 Pending 0 2m34skubectl edit sts mayastor-etcd -n mayastor - name: ETCD_INITIAL_CLUSTER_STATE
value: existing
- name: ETCD_INITIAL_CLUSTER
value: mayastor-etcd-0=http://mayastor-etcd-0.mayastor-etcd-headless.mayastor.svc.cluster.local:2380,mayastor-etcd-1=http://mayastor-etcd-1.mayastor-etcd-headless.mayastor.svc.cluster.local:2380,mayastor-etcd-2=http://mayastor-etcd-2.mayastor-etcd-headless.mayastor.svc.cluster.local:2380,mayastor-etcd-3=http://mayastor-etcd-3.mayastor-etcd-headless.mayastor.svc.cluster.local:2380apiVersion: v1
kind: PersistentVolume
metadata:
annotations:
meta.helm.sh/release-name: mayastor
meta.helm.sh/release-namespace: mayastor
pv.kubernetes.io/bound-by-controller: "yes"
finalizers:
- kubernetes.io/pv-protection
labels:
app.kubernetes.io/managed-by: Helm
statefulset.kubernetes.io/pod-name: mayastor-etcd-3
name: etcd-volume-3
spec:
accessModes:
- ReadWriteOnce
capacity:
storage: 2Gi
claimRef:
apiVersion: v1
kind: PersistentVolumeClaim
name: data-mayastor-etcd-3
namespace: mayastor
hostPath:
path: /var/local/mayastor/etcd/pod-3
type: ""
persistentVolumeReclaimPolicy: Delete
storageClassName: manual
volumeMode: Filesystemkubectl apply -f pv-etcd.yaml -n mayastor
persistentvolume/etcd-volume-3 createdkubectl exec -it mayastor-etcd-3 -n mayastor -- bash
#ETCDCTL_API=3
#etcdctl get --prefix ""This website/page will be End-of-life (EOL) after 31 August 2024. We recommend you to visit OpenEBS Documentation for the latest Mayastor documentation (v2.6 and above).
Mayastor is now also referred to as OpenEBS Replicated PV Mayastor.
The supportability tool collects Mayastor specific information from the cluster using the command-line tool. It uses the dump command, which interacts with the Mayastor services to build an archive (ZIP) file that acts as a placeholder for the bundled information.
To bundle Mayastor's complete system information, execute:
To view all the available options and sub-commands that can be used with the dump command, execute:
The archive files generated by the dump command are stored in the specified output directories. The tables below specify the path and the content that will be stored in each archive file.
The supportability tool generates support bundles, which are used for debugging purposes. These bundles are created in response to the user's invocation of the tool and can be transmitted only by the user. Below is the information collected by the supportability tool that might be identified as 'sensitive' based on the organization's data protection/privacy commitments and security policies. Logs: The default installation of Mayastor includes the deployment of a log aggregation subsystem based on Grafana Loki. All the pods deployed in the same namespace as Mayastor and labelled with openebs.io/logging=true will have their logs incorporated within this centralized collector. These logs may include the following information:
Kubernetes (K8s) node hostnames
IP addresses
container addresses
API endpoints
K8s Events: The archive files generated by the supportability tool contain information on all the events of the Kubernetes cluster present in the same namespace as Mayastor.
etcd Dump: The default installation of Mayastor deploys an etcd instance for its exclusive use. This key-value pair is used to persist state information for Mayastor-managed objects. These key-value pairs are required for diagnostic and troubleshooting purposes. The etcd dump archive file consists of the following information:
Kubernetes node hostnames
IP addresses
PVC/PV names
Container names
This website/page will be End-of-life (EOL) after 31 August 2024. We recommend you to visit OpenEBS Documentation for the latest Mayastor documentation (v2.6 and above).
Mayastor is now also referred to as OpenEBS Replicated PV Mayastor.
Volume restore from an existing snapshot will create an exact replica of a storage volume captured at a specific point in time. They serve as an essential tool for data protection, recovery, and efficient management in Kubernetes environments. This article provides a step-by-step guide on how to create a volume restore.
To begin, you'll need to create a StorageClass that defines the properties of the snapshot to be restored. Refer to for more details. Use the following command to create the StorageClass:
Note the name of the StorageClass, which, in this example, is mayastor-1-restore.
You need to create a volume snapshot before proceeding with the restore. Follow the steps outlined in to create a volume snapshot.
Note the snapshot's name, for example, pvc-snap-1.
After creating a snapshot, you can create a PersistentVolumeClaim (PVC) from it to generate the volume restore. Use the following command:
By running this command, you create a new PVC named restore-pvc based on the specified snapshot. The restored volume will have the same data and configuration as the original volume had at the time of the snapshot.
This website/page will be End-of-life (EOL) after 31 August 2024. We recommend you to visit OpenEBS Documentation for the latest Mayastor documentation (v2.6 and above).
Mayastor is now also referred to as OpenEBS Replicated PV Mayastor.
When a Mayastor volume is provisioned based on a StorageClass which has a replication factor greater than one (set by its repl parameter), the control plane will attempt to maintain through a 'Kubernetes-like' reconciliation loop that number of identical copies of the volume's data "replicas" (a replica is a nexus target "child") at any point in time. When a volume is first provisioned the control plane will attempt to create the required number of replicas, whilst adhering to its internal heuristics for their location within the cluster (which will be discussed shortly). If it succeeds, the volume will become available and will bind with the PVC. If the control plane cannot identify a sufficient number of eligble Mayastor Pools in which to create required replicas at the time of provisioning, the operation will fail; the Mayastor Volume will not be created and the associated PVC will not be bound. Kubernetes will periodically re-try the volume creation and if at any time the appropriate number of pools can be selected, the volume provisioning should succeed.
Once a volume is processing I/O, each of its replicas will also receive I/O. Reads are round-robin distributed across replicas, whilst writes must be written to all. In a real world environment this is attended by the possibility that I/O to one or more replicas might fail at any time. Possible reasons include transient loss of network connectivity, node reboots, node or disk failure. If a volume's nexus (NVMe controller) encounters 'too many' failed I/Os for a replica, then that replica's child status will be marked Faulted and it will no longer receive I/O requests from the nexus. It will remain a member of the volume, whose departure from the desired state with respect to replica count will be reflected with a volume status of Degraded. How many I/O failures are considered "too many" in this context is outside the scope of this discussion.
The control plane will first 'retire' the old, faulted one which will then no longer be associated to the volume. Once retired, a replica will become available for garbage collection (deletion from the Mayastor Pool containing it), assuming that the nature of the failure was such that the pool itself is still viable (i.e. the underlying disk device is still accessible). Then it will attempt to restore the desired state (replica count) by creating a new replica, following its replica placement rules. If it succeeds, the nexus will "rebuild" that new replica - performing a full copy of all data from a healthy replica Online, i.e. the source. This process can proceed whilst the volume continues to process application I/Os although it will contend for disk throughput at both the source and destination disks.
If a nexus is cleanly restarted, i.e. the Mayastor pod hosting it restarts gracefully, with the assistance of the control plane it will 'recompose' itself; all of the previous healthy member replicas will be re-attached to it. If previously faulted replicas are available to be re-connected (Online), then the control plane will attempt to reuse and rebuild them directly, rather than seek replacements for them first. This edge-case therefore does not result in the retirement of the affected replicas; they are simply reused. If the rebuild fails then we follow the above process of removing a Faulted replica and adding a new one. On an unclean restart (i.e. the Mayastor pod hosting the nexus crashes or is forcefully deleted) only one healthy replica will be re-attached and all other replicas will eventually be rebuilt.
Once provisioned, the replica count of a volume can be changed using the kubectl-mayastor plugin scale subcommand. The value of the num_replicas field may be either increased or decreased by one and the control plane will attempt to satisfy the request by creating or destroying a replicas as appropriate, following the same replica placement rules as described herein. If the replica count is reduced, faulted replicas will be selected for removal in preference to healthy ones.
Accurate predictions of the behaviour of Mayastor with respect to replica placement and management of replica faults can be made by reference to these 'rules', which are a simplified representation of the actual logic:
"Rule 1": A volume can only be provisioned if the replica count (and capacity) of its StorageClass can be satisfied at the time of creation
"Rule 2": Every replica of a volume must be placed on a different Mayastor Node)
"Rule 3": Children with the state Faulted are always selected for retirement in preference to those with state Online
N.B.: By application of the 2nd rule, replicas of the same volume cannot exist within different pools on the same Mayastor Node.
A cluster has two Mayastor nodes deployed, "Node-1" and "Node-2". Each Mayastor node hosts two Mayastor pools and currently, no Mayastor volumes have been defined. Node-1 hosts pools "Pool-1-A" and "Pool-1-B", whilst Node-2 hosts "Pool-2-A and "Pool-2-B". When a user creates a PVC from a StorageClass which defines a replica count of 2, the Mayastor control plane will seek to place one replica on each node (it 'follows' Rule 2). Since in this example it can find a suitable candidate pool with sufficient free capacity on each node, the volume is provisioned and becomes "healthy" (Rule 1). Pool-1-A is selected on Node-1, and Pool-2-A selected on Node-2 (all pools being of equal capacity and replica count, in this initial 'clean' state).
Sometime later, the physical disk of Pool-2-A encounters a hardware failure and goes offline. The volume is in use at the time, so its nexus (NVMe controller) starts to receive I/O errors for the replica hosted in that Pool. The associated replica's child from Pool-2-A enters the Faulted state and the volume state becomes Degraded (as seen through the kubectl-mayastor plugin).
Expected Behaviour: The volume will maintain read/write access for the application via the remaining healthy replica. The faulty replica from Pool-2-A will be removed from the Nexus thus changing the nexus state to Online as the remaining is healthy. A new replica is created on either Pool-2-A or Pool-2-B and added to the nexus. The new replica child is rebuilt and eventually the state of the volume returns to Online.
A cluster has three Mayastor nodes deployed, "Node-1", "Node-2" and "Node-3". Each Mayastor node hosts one pool: "Pool-1" on Node-1, "Pool-2" on Node-2 and "Pool-3" on Node-3. No Mayastor volumes have yet been defined; the cluster is 'clean'. A user creates a PVC from a StorageClass which defines a replica count of 2. The control plane determines that it is possible to accommodate one replica within the available capacity of each of Pool-1 and Pool-2, and so the volume is created. An application is deployed on the cluster which uses the PVC, so the volume receives I/O.
Unfortunately, due to user error the SAN LUN which is used to persist Pool-2 becomes detached from Node-2, causing I/O failures in the replica which it hosts for the volume. As with scenario one, the volume state becomes Degraded and the faulted child's becomes Faulted.
Expected Behaviour: Since there is a Mayastor pool on Node-3 which has sufficient capacity to host a replacement replica, a new replica can be created (Rule 2: this 'third' incoming replica isn't located on either of the nodes that the two original ones are). The faulted replica in Pool-2 is retired from the nexus and a new replica is created on Pool-3 and added to the nexus. The new replica is rebuilt and eventually the state of the volume returns to Online.
In the cluster from Scenario three, sometime after the Mayastor volume has returned to the Online state, a user scales up the volume, increasing the num_replicas value from 2 to 3. Before doing so they corrected the SAN misconfiguration and ensured that the pool on Node-2 was Online.
Expected Behaviour: The control plane will attempt to reconcile the difference in current (replicas = 2) and desired (replicas = 3) states. Since Node-2 no longer hosts a replica for the volume (the previously faulted replica was successfully retired and is no longer a member of the volume's nexus), the control plane will select it to host the new replica required (Rule 2 permits this). The volume state will become initially Degraded to reflect the difference in actual vs required redundant data copies but a rebuild of the new replica will be performed and eventually the volume state will be Online again.
A cluster has three Mayastor nodes deployed; "Node-1", "Node-2" and "Node-3". Each Mayastor node hosts two Mayastor pools and currently, no Mayastor volumes have been defined. Node-1 hosts pools "Pool-1-A" and "Pool-1-B", whilst Node-2 hosts "Pool-2-A and "Pool-2-B" and Node-3 hosts "Pool-3-A" and "Pool-3-B". A single volume exists in the cluster, which has a replica count of 3. The volume's replicas are all healthy and are located on Pool-1-A, Pool-2-A and Pool-3-A. An application is using the volume, so all replicas are receiving I/O.
The host Node-3 goes down causing failure of all I/O sent to the replica it hosts from Pool-3-A.
Expected Behaviour: The volume will enter and remain in the Degraded state. The associated child from the replica from Pool-3-A will be in the state Faulted, as observed in the volume through the kubectl-mayastor plugin. Said replica will be removed from the Nexus thus changing the nexus state to Online as the other replicas are healthy. The replica will then be disowned from the volume (it won't be possible to delete it since the host is down). Since Rule 2 dictates that every replica of a volume must be placed on a different Mayastor Node no new replica can be created at this point and the volume remains Degraded indefinitely.
Given the post-host failure situation of Scenario four, the user scales down the volume, reducing the value of num_replicas from 3 to 2.
Expected Behaviour: The control plane will reconcile the actual (replicas=3) vs desired (replicas=2) state of the volume. The volume state will become Online again.
In scenario Five, after scaling down the Mayastor volume the user waits for the volume state to become Online again. The desired and actual replica count are now 2. The volume's replicas are located in pools on both Node-1 and Node-2. The Node-3 is now back up and its pools Pool-3-A and Pool-3-B are Online. The user then scales the volume again, increasing the num_replicas from 2 to 3 again.
Expected Behaviour: The volume's state will become Degraded, reflecting the difference in desired vs actual replica count. The control plane will select a pool on Node-3 as the location for the new replica required. Node-3 is therefore again a suitable candidate and has online pools with sufficient capacity.
./topology/volume
volume
volume-01
volume-01-topology.json
Topology information of volume-01 (All volume topologies will available here)
./logs/csi-controller
-
csi-controller
loki-csi-controller.log
./logs/csi-controller
-
csi-provisioner
loki-csi-provisioner.log
./logs/diskpool-operator
-
operator-diskpool
loki-operator-disk-pool.log
./logs/mayastor
node-02
csi-driver-registrar
node-02-loki-csi-driver-registrar.log
./logs/mayastor
node-01
csi-node
node-01-loki-csi-node.log
./logs/mayastor
node-01
io-engine
node-01-loki-mayastor.log
./logs/blot
node-02
io-engine
node-02-loki-mayastor.log
./logs/etcd
node-03
etcd
node-03-loki-etcd.log
./k8s_resources/configurations/
etcd (Statefullset)
mayastor-etcd.yaml
./k8s_resources/configurations/
loki (Statefullset)
mayastor-loki-yaml
./k8s_resources/configurations/
operator-diskpool
mayastor-operator-disk-pool.yaml
./k8s_resources/configurations/
promtail(Daemonset)
mayastor-promtail.yaml
./k8s_resources/configurations/
io-engine (Daemonset)
io-engine.yaml
./k8s_resources/configurations/
disk_pools
k8s_diskPools.yaml
./k8s_resources
events
k8s_events.yaml
./k8s_resources/configurations/
all pods(deployed under the same namespace as Mayastor)
pods.yaml
./k8s_resources
volume snapshot classes
volume_snapshot_classes.yaml
./k8s_resources
volume snapshot contents
volume_snapshot_contents.yaml
Mayastor
K8s
Container names
K8s Persistent Volume names (provisioned by Mayastor)
DiskPool names
Block device details (except the content) K8s Definition Files: The support bundle includes definition files for all the Mayastor components. Some of these are listed below:
Deployments
DaemonSets
StatefulSets
VolumeSnapshotClass
VolumeSnapshotContent
Mayastor
User applications within the mayastor namespace
Block device details (except data content)
./topology/node
node
node-01
node-01-topology.json
Topology of node-01(All node topologies will available here)
./topology/pool
pool
pool-01
pool-01-topology.json
Topology of pool-01 (All pool topologies will available here)
./logs/core-agents
-
agent-core
loki-agent-core.log
./logs/rest
-
api-rest
loki-api-rest.log
./logs/csi-controller
-
csi-attacher
./k8s_resources/configurations/
agent-core (Deployment)
mayastor-agent-core.yaml
./k8s_resources/configurations/
api-rest
mayastor-api-rest.yaml
./k8s_resources/configurations/
si-controller (Deployment)
mayastor-csi-controller.yaml
./k8s_resources/configurations/
csi-node(Daemonset)
./
etcd
etcd_dump
./
Support-tool
support_tool_logs.log
kubectl mayastor dump --help`Dump` resources
Usage: kubectl-mayastor dump [OPTIONS] <COMMAND>
Commands:
system Collects entire system information
etcd Collects information from etcd
help Print this message or the help for the given subcommand(s)
Options:
-r, --rest <REST>
The rest endpoint to connect to
-t, --timeout <TIMEOUT>
Specifies the timeout value to interact with other modules of system [default: 10s]
-k, --kube-config-path <KUBE_CONFIG_PATH>
Path to kubeconfig file
-s, --since <SINCE>
Period states to collect all logs from last specified duration [default: 24h]
-l, --loki-endpoint <LOKI_ENDPOINT>
LOKI endpoint, if left empty then it will try to parse endpoint from Loki service(K8s service resource), if the tool is unable to parse from service then logs will be collected using Kube-apiserver
-e, --etcd-endpoint <ETCD_ENDPOINT>
Endpoint of ETCD service, if left empty then will be parsed from the internal service name
-d, --output-directory-path <OUTPUT_DIRECTORY_PATH>
Output directory path to store archive file [default: ./]
-n, --namespace <NAMESPACE>
Kubernetes namespace of mayastor service [default: mayastor]
-o, --output <OUTPUT>
The Output, viz yaml, json [default: none]
-j, --jaeger <JAEGER>
Trace rest requests to the Jaeger endpoint agent
-h, --help
Print help
Supportability - collects state & log information of services and dumps it to a tar file. loki-csi-attacher.log
mayastor-csi-node.yaml
cat <<EOF | kubectl create -f -
apiVersion: storage.k8s.io/v1
kind: StorageClass
metadata:
  name: mayastor-1-restore
parameters:
  ioTimeout: "30"
  protocol: nvmf
  repl: "1"
  thin: "true"
provisioner: io.openebs.csi-mayastor
EOFapiVersion: storage.k8s.io/v1
kind: StorageClass
metadata:
name: mayastor-1-restore
parameters:
ioTimeout: "30"
protocol: nvmf
repl: "1"
thin: "true"
provisioner: io.openebs.csi-mayastorkubectl mayastor dump system -n mayastor -d <output_directory_path>cat <<EOF | kubectl create -f -
apiVersion: v1
kind: PersistentVolumeClaim
metadata:
  name: restore-pvc //add a name for your new volume
spec:
  storageClassName: mayastor-1-restore //add your storage class name
  dataSource:
    name: pvc-snap-1 //add your volumeSnapshot name
    kind: VolumeSnapshot
    apiGroup: snapshot.storage.k8s.io
  accessModes:
    - ReadWriteOnce
  resources:
    requests:
      storage: 10Gi
EOF apiVersion: v1
kind: PersistentVolumeClaim
metadata:
name: restore-pvc //add a name for your new volume
spec:
storageClassName: mayastor-1-restore //add your storage class name
dataSource:
name: pvc-snap-1 //add your volumeSnapshot name
kind: VolumeSnapshot
apiGroup: snapshot.storage.k8s.io
accessModes:
- ReadWriteOnce
resources:
requests:
storage: 10GiThis website/page will be End-of-life (EOL) after 31 August 2024. We recommend you to visit OpenEBS Documentation for the latest Mayastor documentation (v2.6 and above).
Mayastor is now also referred to as OpenEBS Replicated PV Mayastor.
Volume snapshots are copies of a persistent volume at a specific point in time. They can be used to restore a volume to a previous state or create a new volume. Mayastor provides support for industry standard copy-on-write (COW) snapshots, which is a popular methodology for taking snapshots by keeping track of only those blocks that have changed. Mayastor incremental snapshot capability enhances data migration and portability in Kubernetes clusters across different cloud providers or data centers. Using standard kubectl commands, you can seamlessly perform operations on snapshots and clones in a fully Kubernetes-native manner.
Use cases for volume snapshots include:
Efficient replication for backups.
Utilization of clones for troubleshooting.
Development against a read-only copy of data.
Volume snapshots allow the creation of read-only incremental copies of volumes, enabling you to maintain a history of your data. These volume snapshots possess the following characteristics:
Consistency: The data stored within a snapshot remains consistent across all replicas of the volume, whether local or remote.
Immutability: Once a snapshot is successfully created, the data contained within it cannot be modified.
Currently, Mayastor supports the following operations related to volume snapshots:
Creating a snapshot for a PVC
Listing available snapshots for a PVC
Deleting a snapshot for a PVC
Deploy and configure Mayastor by following the steps given and create disk pools.
Create a Mayastor StorageClass with single replica.
Create a PVC using steps and check if the status of the PVC is Bound.
Copy the PVC name, for example,
ms-volume-claim.
(Optional) Create an application by following steps.
You can create a snapshot (with or without an application) using the PVC. Follow the steps below to create a volume snapshot:
Apply VolumeSnapshotClass details
Apply the snapshot
To retrieve the details of the created snapshots, use the following command:
To delete a snapshot, use the following command:
This website/page will be End-of-life (EOL) after 31 August 2024. We recommend you to visit OpenEBS Documentation for the latest Mayastor documentation (v2.6 and above).
Mayastor is now also referred to as OpenEBS Replicated PV Mayastor.
Mayastor will fully utilize each CPU core that it was configured to run on. It will spawn a thread on each and the thread will run in an endless loop serving tasks dispatched to it without sleeping or blocking. There are also other Mayastor threads that are not bound to the CPU and those are allowed to block and sleep. However, the bound threads (also called reactors) rely on being interrupted by the kernel and other userspace processes as little as possible. Otherwise, the latency of IO may suffer.
Ideally, the only thing that interrupts Mayastor's reactor would be only kernel time-based interrupts responsible for CPU accounting. However, that is far from trivial. isolcpus option that we will be using does not prevent:
kernel threads and
other k8s pods to run on the isolated CPU
However, it prevents system services including kubelet from interfering with Mayastor.
Note that the best way to accomplish this step may differ, based on the Linux distro that you are using.
Add the isolcpus kernel boot parameter to GRUB_CMDLINE_LINUX_DEFAULT in the grub configuration file, with a value which identifies the CPUs to be isolated (indexing starts from zero here). The location of the configuration file to change is typically /etc/default/grub but may vary. For example when running Ubuntu 20.04 in AWS EC2 Cloud boot parameters are in /etc/default/grub.d/50-cloudimg-settings.cfg.
In the following example we assume a system with 4 CPU cores in total, and that the third and the fourth CPU cores are to be dedicated to Mayastor.
Basic verification is by outputting the boot parameters of the currently running kernel:
You can also print a list of isolated CPUs:
To allot specific CPU cores for Mayastor's reactors, follow these steps:
Ensure that you have the Mayastor kubectl plugin installed, matching the version of your Mayastor Helm chart deployment (). You can find installation instructions in the .
Execute the following command to update Mayastor's configuration. Replace <namespace> with the appropriate Kubernetes namespace where Mayastor is deployed.
In the above command, io_engine.coreList={2,3} specifies that Mayastor's reactors should operate on the third and fourth CPU cores.
This website/page will be End-of-life (EOL) after 31 August 2024. We recommend you to visit OpenEBS Documentation for the latest Mayastor documentation (v2.6 and above).
Mayastor is now also referred to as OpenEBS Replicated PV Mayastor.
Mayastor 2.0 enhances High Availability (HA) of the volume target with the nexus switch-over feature. In the event of the target failure, the switch-over feature quickly detects the failure and spawns a new nexus to ensure I/O continuity. The HA feature consists of two components: the HA node agent (which runs in each csi- node) and the cluster agent (which runs alongside the agent-core). The HA node agent looks for io-path failures from applications to their corresponding targets. If any such broken path is encountered, the HA node agent informs the cluster agent. The cluster-agent then creates a new target on a different (live) node. Once the target is created, the node-agent establishes a new path between the application and its corresponding target. The HA feature restores the broken path within seconds, ensuring negligible downtime.
The volume's replica count must be higher than 1 for a new target to be established as part of switch-over.
The HA feature is enabled by default; to disable it, pass the parameter --set=agents.ha.enabled=false with the helm install command.
This website/page will be End-of-life (EOL) after 31 August 2024. We recommend you to visit OpenEBS Documentation for the latest Mayastor documentation (v2.6 and above).
Mayastor is now also referred to as OpenEBS Replicated PV Mayastor.
This quickstart guide describes the actions necessary to perform a basic installation of Mayastor on an existing Kubernetes cluster, sufficient for evaluation purposes. It assumes that the target cluster will pull the Mayastor container images directly from OpenEBS public container repositories. Where preferred, it is also possible to build Mayastor locally from source and deploy the resultant images but this is outside of the scope of this guide.
Deploying and operating Mayastor in production contexts requires a foundational knowledge of Mayastor internals and best practices, found elsewhere within this documentation.
Name
String
Custom name of the snapshot class
Driver
String
CSI provisioner of the storage provider being requested to create a snapshot (io.openebs.csi-mayastor)
Name
String
Name of the snapshot
VolumeSnapshotClassName
String
Name of the created snapshot class
PersistentVolumeClaimName
String
Name of the PVC. Example- ms-volume-claim
Sourcing file `/etc/default/grub'
Sourcing file `/etc/default/grub.d/40-force-partuuid.cfg'
Sourcing file `/etc/default/grub.d/50-cloudimg-settings.cfg'
Sourcing file `/etc/default/grub.d/init-select.cfg'
Generating grub configuration file ...
Found linux image: /boot/vmlinuz-5.8.0-29-generic
Found initrd image: /boot/microcode.cpio /boot/initrd.img-5.8.0-29-generic
Found linux image: /boot/vmlinuz-5.4.0-1037-aws
Found initrd image: /boot/microcode.cpio /boot/initrd.img-5.4.0-1037-aws
Found Ubuntu 20.04.2 LTS (20.04) on /dev/xvda1
donesudo update-grubcat <<EOF | kubectl create -f -
apiVersion: storage.k8s.io/v1
kind: StorageClass
metadata:
  name: mayastor-1
parameters:
  ioTimeout: "30"
  protocol: nvmf
  repl: "1"
provisioner: io.openebs.csi-mayastor
EOFapiVersion: storage.k8s.io/v1
kind: StorageClass
metadata:
name: mayastor-1
parameters:
ioTimeout: "30"
protocol: nvmf
repl: "1"
provisioner: io.openebs.csi-mayastorkubectl get pvcNAME STATUS VOLUME CAPACITY ACCESS MODES STORAGECLASS AGE
ms-volume-claim Bound pvc-fe1a5a16-ef70-4775-9eac-2f9c67b3cd5b 1Gi RWO mayastor-1 15scat <<EOF | kubectl create -f -
kind: VolumeSnapshotClass
apiVersion: snapshot.storage.k8s.io/v1
metadata:
  name: csi-mayastor-snapshotclass
  annotations:
    snapshot.storage.kubernetes.io/is-default-class: "true"
driver: io.openebs.csi-mayastor
deletionPolicy: Delete
EOFkind: VolumeSnapshotClass
apiVersion: snapshot.storage.k8s.io/v1
metadata:
name: csi-mayastor-snapshotclass
annotations:
snapshot.storage.kubernetes.io/is-default-class: "true"
driver: io.openebs.csi-mayastor
deletionPolicy: Deletekubectl apply -f class.yamlvolumesnapshotclass.snapshot.storage.k8s.io/csi-mayastor-snapshotclass createdcat <<EOF | kubectl create -f -
apiVersion: snapshot.storage.k8s.io/v1
kind: VolumeSnapshot
metadata:
  name: mayastor-pvc-snap-1
spec:
  volumeSnapshotClassName: csi-mayastor-snapshotclass
  source:
    persistentVolumeClaimName: ms-volume-claim
EOFapiVersion: snapshot.storage.k8s.io/v1
kind: VolumeSnapshot
metadata:
name: mayastor-pvc-snap-1
spec:
volumeSnapshotClassName: csi-mayastor-snapshotclass
source:
persistentVolumeClaimName: ms-volume-claim kubectl apply -f snapshot.yamlvolumesnapshot.snapshot.storage.k8s.io/mayastor-pvc-snap-1 createdkubectl get volumesnapshot NAME READYTOUSE SOURCEPVC SOURCESNAPSHOTCONTENT RESTORESIZE SNAPSHOTCLASS SNAPSHOTCONTENT CREATIONTIME AGE
mayastor-pvc-snap-1 true ms-volume-claim 1Gi csi-mayastor-snapshotclass snapcontent-174d9cd9-dfb2-4e53-9b56-0f3f783518df 57s 57skubectl get volumesnapshotcontentNAME READYTOUSE RESTORESIZE DELETIONPOLICY DRIVER VOLUMESNAPSHOTCLASS VOLUMESNAPSHOT VOLUMESNAPSHOTNAMESPACE AGE
snapcontent-174d9cd9-dfb2-4e53-9b56-0f3f783518df true 1073741824 Delete io.openebs.csi-mayastor csi-mayastor-snapshotclass mayastor-pvc-snap-1 default 87skubectl delete volumesnapshot mayastor-pvc-snap-1 volumesnapshot.snapshot.storage.k8s.io "mayastor-pvc-snap-1" deletedGRUB_CMDLINE_LINUX_DEFAULT="quiet splash isolcpus=2,3"sudo rebootcat /proc/cmdlineBOOT_IMAGE=/boot/vmlinuz-5.8.0-29-generic root=PARTUUID=7213a253-01 ro console=tty1 console=ttyS0 nvme_core.io_timeout=4294967295 isolcpus=2,3 panic=-1cat /sys/devices/system/cpu/isolated2-3kubectl mayastor upgrade -n <namespace> --set-args 'io_engine.coreList={2,3}'This website/page will be End-of-life (EOL) after 31 August 2024. We recommend you to visit OpenEBS Documentation for the latest Mayastor documentation (v2.6 and above).
Mayastor is now also referred to as OpenEBS Replicated PV Mayastor.
For basic test and evaluation purposes it may not always be practical or possible to allocate physical disk devices on a cluster to Mayastor for use within its pools. As a convenience, Mayastor supports two disk device type emulations for this purpose:
Memory-Backed Disks ("RAM drive")
File-Backed Disks
Memory-backed Disks are the most readily provisioned if node resources permit, since Mayastor will automatically create and configure them as it creates the corresponding pool. However they are the least durable option - since the data is held entirely within memory allocated to a Mayastor pod, should that pod be terminated and rescheduled by Kubernetes, that data will be lost. Therefore it is strongly recommended that this type of disk emulation be used only for short duration, simple testing. It must not be considered for production use.
File-backed disks, as their name suggests, store pool data within a file held on a file system which is accessible to the Mayastor pod hosting that pool. Their durability depends on how they are configured; specifically on which type of volume mount they are located. If located on a path which uses Kubernetes ephemeral storage (eg. EmptyDir), they may be no more persistent than a RAM drive would be. However, if placed on their own Persistent Volume (eg. a Kubernetes Host Path volume) then they may considered 'stable'. They are slightly less convenient to use than memory-backed disks, in that the backing files must be created by the user as a separate step preceding pool creation. However, file-backed disks can be significantly larger than RAM disks as they consume considerably less memory resource within the hosting Mayastor pod.
Creating a memory-backed disk emulation entails using the "malloc" uri scheme within the Mayastor pool resource definition.
The example shown defines a pool named "mempool-1". The Mayastor pod hosted on "worker-node-1" automatically creates a 64MiB emulated disk for it to use, with the device identifier "malloc0" - provided that at least 64MiB of 2MiB-sized Huge Pages are available to that pod after the Mayastor container's own requirements have been satisfied.
The pool definition caccepts URIs matching the malloc:/// schema within its disks field for the purposes of provisioning memory-based disks. The general format is:
malloc:///malloc<DeviceId>?<parameters>
Where <DeviceId> is an integer value which uniquely identifies the device on that node, and where the parameter collection <parameters> may include the following:
Note: Memory-based disk devices are not over-provisioned and the memory allocated to them is so from the 2MiB-sized Huge Page resources available to the Mayastor pod. That is to say, to create a 64MiB device requires that at least 33 (32+1) 2MiB-sized pages are free for that Mayastor container instance to use. Satisfying the memory requirements of this disk type may require additional configuration on the worker node and changes to the resource request and limit spec of the Mayastor daemonset, in order to ensure that sufficient resource is available.
Mayastor can use file-based disk emulation in place of physical pool disk devices, by employing the aio:/// URI schema within the pool's declaration in order to identify the location of the file resource.
The examples shown seek to create a pool using a file named "disk1.img", located in the /var/tmp directory of the Mayastor container's file system, as its member disk device. For this operation to succeed, the file must already exist on the specified path (which should be FULL path to the file) and this path must be accessible by the Mayastor pod instance running on the corresponding node.
The aio:/// schema requires no other parameters but optionally, "blk_size" may be specified. Block size accepts a value of either 512 or 4096, corresponding to the emulation of either a 512-byte or 4kB sector size device. If this parameter is omitted the device defaults to using a 512-byte sector size.
File-based disk devices are not over-provisioned; to create a 10GiB pool disk device requires that a 10GiB-sized backing file exist on a file system on an accessible path.
The preferred method of creating a backing file is to use the linux truncate command. The following example demonstrates the creation of a 1GiB-sized file named disk1.img within the directory /tmp.
This website/page will be End-of-life (EOL) after 31 August 2024. We recommend you to visit OpenEBS Documentation for the latest Mayastor documentation (v2.6 and above).
Mayastor is now also referred to as OpenEBS Replicated PV Mayastor.
v1.25.10
v1.23.7
v1.22.10
v1.21.13
This website/page will be End-of-life (EOL) after 31 August 2024. We recommend you to visit OpenEBS Documentation for the latest Mayastor documentation (v2.6 and above).
Mayastor is now also referred to as OpenEBS Replicated PV Mayastor.
By following the given steps, you can successfully migrate etcd from one node to another during maintenance activities like node drain etc., ensuring the continuity and integrity of the etcd data.
Assuming we have a three-node cluster with three etcd replicas, verify the etcd pods with the following commands:
Command to verify pods:
From etcd-0/1/2 we could see all the values are registered in database, once we migrated etcd to new node, all the key-value pairs should be available across all the pods. Run the following commands from any etcd pod.
Commands to get etcd data:
In this example, we drain the etcd node worker-0 and migrate it to the next available node (in this case, the worker-4 node), use the following command:
Command to drain the node:
After draining the worker-0 node, the etcd pod will be scheduled on the next available node, which is the worker-4 node.
The pod may end up in a CrashLoopBackOff status with specific errors in the logs.
When the pod is scheduled on the new node, it attempts to bootstrap the member again, but since the member is already registered in the cluster, it fails to start the etcd server with the error message member already bootstrapped.
Command to check new etcd pod status
Command to edit the StatefulSet:
Run the appropriate command from the migrated etcd pod to validate the key-value pairs and ensure they are the same as in the existing etcd. This step is crucial to avoid any data loss during the migration process.
This website/page will be End-of-life (EOL) after 31 August 2024. We recommend you to visit OpenEBS Documentation for the latest Mayastor documentation (v2.6 and above).
Mayastor is now also referred to as OpenEBS Replicated PV Mayastor.
All worker nodes must satisfy the following requirements:
x86-64 CPU cores with SSE4.2 instruction support
(Tested on) Linux kernel 5.15 (Recommended) Linux kernel 5.13 or higher. The kernel should have the following modules loaded:
nvme-tcp
Ensure that the following ports are not in use on the node:
10124: Mayastor gRPC server will use this port.
8420 / 4421: NVMf targets will use these ports.
Disks must be unpartitioned, unformatted, and used exclusively by the DiskPool.
The minimum capacity of the disks should be 10 GB.
Kubernetes core v1 API-group resources: Pod, Event, Node, Namespace, ServiceAccount, PersistentVolume, PersistentVolumeClaim, ConfigMap, Secret, Service, Endpoint, Event.
Kubernetes batch API-group resources: CronJob, Job
Kubernetes apps API-group resources: Deployment, ReplicaSet, StatefulSet, DaemonSet
Kubernetes
The minimum supported worker node count is three nodes. When using the synchronous replication feature (N-way mirroring), the number of worker nodes to which Mayastor is deployed should be no less than the desired replication factor.
Mayastor supports the export and mounting of volumes over NVMe-oF TCP only. Worker node(s) on which a volume may be scheduled (to be mounted) must have the requisite initiator support installed and configured. In order to reliably mount Mayastor volumes over NVMe-oF TCP, a worker node's kernel version must be 5.13 or later and the nvme-tcp kernel module must be loaded.
This website/page will be End-of-life (EOL) after 31 August 2024. We recommend you to visit OpenEBS Documentation for the latest Mayastor documentation (v2.6 and above).
Mayastor is now also referred to as OpenEBS Replicated PV Mayastor.
The steps and commands which follow are intended only for use in conjunction with Mayastor version(s) 2.1.x and above.
Add the OpenEBS Mayastor Helm repository.
Run the following command to discover all the stable versions of the added chart repository:
Run the following command to install Mayastor _version 2.4.
Verify the status of the pods by running the command:
The native NVMe-oF CAS engine of OpenEBS
It is provided here as a convenience to the writers, reviewers and editors of Mayastor's user documentation, to provide easy visualisation of content before publishing. It MUST NOT be used to guide the installation or use of Mayastor, other than for pre-release testing outside of production. As a staging branch, it is expected at times to contain errors and to be incomplete.
This website/page will be End-of-life (EOL) after 31 August 2024. We recommend you to visit for the latest Mayastor documentation (v2.6 and above).
Mayastor is now also referred to as OpenEBS Replicated PV Mayastor.
Mayastor is a performance optimised "Container Attached Storage" (CAS) solution of the CNCF project . The goal of OpenEBS is to extend Kubernetes with a declarative data plane, providing flexible persistent storage for stateful applications.
Design goals for Mayastor include:
Highly available, durable persistence of data
To be readily deployable and easily managed by autonomous SRE or development teams
To be a low-overhead abstraction for NVMe-based storage devices
Mayastor incorporates Intel's . It has been designed from the ground up to leverage the protocol and compute efficiency of NVMe-oF semantics, and the performance capabilities of the latest generation of solid-state storage devices, in order to deliver a storage abstraction with performance overhead measured to be within the range of single-digit percentages.
By comparison, most "shared everything" storage systems are widely thought to impart an overhead of at least 40% (and sometimes as much as 80% or more) as compared to the capabilities of the underlying devices or cloud volumes; additionally traditional shared storage scales in an unpredictable manner as I/O from many workloads interact and compete for resources.
While Mayastor utilizes NVMe-oF it does not require NVMe devices or cloud volumes to operate and can work well with other device types.
Mayastor's source code and documentation are distributed amongst a number of GitHub repositories under the OpenEBS organisation. The following list describes some of the main repositories but is not exhaustive.
: contains the source code of the data plane components
: contains the source code of the control plane components
: contains common protocol buffer definitions and OpenAPI specifications for Mayastor components
This website/page will be End-of-life (EOL) after 31 August 2024. We recommend you to visit OpenEBS Documentation for the latest Mayastor documentation (v2.6 and above).
Mayastor is now also referred to as OpenEBS Replicated PV Mayastor.
The objective of this section is to provide the user and evaluator of Mayastor with a topological view of the gross anatomy of a Mayastor deployment. A description will be made of the expected pod inventory of a correctly deployed cluster, the roles and functions of the constituent pods and related Kubernetes resource types, and of the high level interactions between them and the orchestration thereof.
More detailed guides to Mayastor's components, their design and internal structure, and instructions for building Mayastor from source, are maintained within the project's GitHub repository.
The io-engine pod encapsulates Mayastor containers, which implement the I/O path from the block devices at the persistence layer, up to the relevant initiators on the worker nodes mounting volume claims. The Mayastor process running inside this container performs four major functions:
Creates and manages DiskPools hosted on that node.
Creates, exports, and manages volume controller objects hosted on that node.
Creates and exposes replicas from DiskPools hosted on that node over NVMe-TCP.
Provides a gRPC interface service to orchestrate the creation, deletion and management of the above objects, hosted on that node. Before the io-engine pod starts running, an init container attempts to verify connectivity to the agent-core in the namespace where Mayastor has been deployed. If a connection is established, the io-engine pod registers itself over gRPC to the agent-core. In this way, the agent-core maintains a registry of nodes and their supported api-versions. The scheduling of these pods is determined declaratively by using a DaemonSet specification. By default, a nodeSelector field is used within the pod spec to select all worker nodes to which the user has attached the label
The csi-node pods within a cluster implement the node plugin component of Mayastor's CSI driver. As such, their function is to orchestrate the mounting of Mayastor-provisioned volumes on worker nodes on which application pods consuming those volumes are scheduled. By default, a csi-node pod is scheduled on every node in the target cluster, as determined by a DaemonSet resource of the same name. Each of these pods encapsulates two containers, csi-node, and csi-driver-registrar. The node plugin does not need to run on every worker node within a cluster and this behavior can be modified, if desired, through the application of appropriate node labeling and the addition of a corresponding nodeSelector entry within the pod spec of the csi-node DaemonSet. However, it should be noted that if a node does not host a plugin pod, then it will not be possible to schedule an application pod on it, which is configured to mount Mayastor volumes.
etcd is a distributed reliable key-value store for the critical data of a distributed system. Mayastor uses etcd as a reliable persistent store for its configuration and state data.
The supportability tool is used to create support bundles (archive files) by interacting with multiple services present in the cluster where Mayastor is installed. These bundles contain information about Mayastor resources like volumes, pools and nodes, and can be used for debugging. The tool can collect the following information:
Topological information of Mayastor's resource(s) by interacting with the REST service
Historical logs by interacting with Loki. If Loki is unavailable, it interacts with the kube-apiserver to fetch logs.
Mayastor-specific Kubernetes resources by interacting with the kube-apiserver
Mayastor-specific information from etcd (internal) by interacting with the etcd server.
aggregates and centrally stores logs from all Mayastor containers which are deployed in the cluster.
is a log collector built specifically for Loki. It uses the configuration file for target discovery and includes analogous features for labeling, transforming, and filtering logs from containers before ingesting them to Loki.
This website/page will be End-of-life (EOL) after 31 August 2024. We recommend you to visit OpenEBS Documentation for the latest Mayastor documentation (v2.6 and above).
Mayastor is now also referred to as OpenEBS Replicated PV Mayastor.
When a node allocates storage capacity for a replica of a persistent volume (PV) it does so from a DiskPool. Each node may create and manage zero, one, or more such pools. The ownership of a pool by a node is exclusive. A pool can manage only one block device, which constitutes the entire data persistence layer for that pool and thus defines its maximum storage capacity.
A pool is defined declaratively, through the creation of a corresponding DiskPool custom resource on the cluster. The DiskPool must be created in the same namespace where Mayastor has been deployed. User configurable parameters of this resource type include a unique name for the pool, the node name on which it will be hosted and a reference to a disk device which is accessible from that node. The pool definition requires the reference to its member block device to adhere to a discrete range of schemas, each associated with a specific access mechanism/transport/ or device type.
spec.disks under DiskPool CROnce a node has created a pool it is assumed that it henceforth has exclusive use of the associated block device; it should not be partitioned, formatted, or shared with another application or process. Any pre-existing data on the device will be destroyed.
A RAM drive isn't suitable for use in production as it uses volatile memory for backing the data. The memory for this disk emulation is allocated from the hugepages pool. Make sure to allocate sufficient additional hugepages resource on any storage nodes which will provide this type of storage.
To get started, it is necessary to create and host at least one pool on one of the nodes in the cluster. The number of pools available limits the extent to which the synchronous N-way mirroring (replication) of PVs can be configured; the number of pools configured should be equal to or greater than the desired maximum replication factor of the PVs to be created. Also, while placing data replicas ensure that appropriate redundancy is provided. Mayastor's control plane will avoid placing more than one replica of a volume on the same node. For example, the minimum viable configuration for a Mayastor deployment which is intended to implement 3-way mirrored PVs must have three nodes, each having one DiskPool, with each of those pools having one unique block device allocated to it.
Using one or more the following examples as templates, create the required type and number of pools.
The status of DiskPools may be determined by reference to their cluster CRs. Available, healthy pools should report their State as online. Verify that the expected number of pools have been created and that they are online.
Mayastor dynamically provisions PersistentVolumes (PVs) based on StorageClass definitions created by the user. Parameters of the definition are used to set the characteristics and behaviour of its associated PVs. For a detailed description of these parameters see . Most importantly StorageClass definition is used to control the level of data protection afforded to it (that is, the number of synchronous data replicas which are maintained, for purposes of redundancy). It is possible to create any number of StorageClass definitions, spanning all permitted parameter permutations.
We illustrate this quickstart guide with two examples of possible use cases; one which offers no data redundancy (i.e. a single data replica), and another having three data replicas.
This website/page will be End-of-life (EOL) after 31 August 2024. We recommend you to visit OpenEBS Documentation for the latest Mayastor documentation (v2.6 and above).
Mayastor is now also referred to as OpenEBS Replicated PV Mayastor.
If all verification steps in the preceding stages were satisfied, then Mayastor has been successfully deployed within the cluster. In order to verify basic functionality, we will now dynamically provision a Persistent Volume based on a Mayastor StorageClass, mount that volume within a small test pod which we'll create, and use the utility within that pod to check that I/O to the volume is processed correctly.
Use kubectl to create a PVC based on a StorageClass that you created in the . In the example shown below, we'll consider that StorageClass to have been named "mayastor-1". Replace the value of the field "storageClassName" with the name of your own Mayastor-based StorageClass.
For the purposes of this quickstart guide, it is suggested to name the PVC "ms-volume-claim", as this is what will be illustrated in the example steps which follow.
If you used the storage class example from previous stage, then volume binding mode is set to WaitForFirstConsumer. That means, that the volume won't be created until there is an application using the volume. We will go ahead and create the application pod and then check all resources that should have been created as part of that in kubernetes.
The Mayastor CSI driver will cause the application pod and the corresponding Mayastor volume's NVMe target/controller ("Nexus") to be scheduled on the same Mayastor Node, in order to assist with restoration of volume and application availabilty in the event of a storage node failure.
In this version, applications using PVs provisioned by Mayastor can only be successfully scheduled on Mayastor Nodes. This behaviour is controlled by the local: parameter of the corresponding StorageClass, which by default is set to a value of true. Therefore, this is the only supported value for this release - setting a non-local configuration may cause scheduling of the application pod to fail, as the PV cannot be mounted to a worker node other than a MSN. This behaviour will change in a future release.
We will now verify the Volume Claim and that the corresponding Volume and Mayastor Volume resources have been created and are healthy.
The status of the PVC should be "Bound".
The status of the volume should be "online".
Verify that the pod has been deployed successfully, having the status "Running". It may take a few seconds after creating the pod before it reaches that status, proceeding via the "ContainerCreating" state.
We now execute the FIO Test utility against the Mayastor PV for 60 seconds, checking that I/O is handled as expected and without errors. In this quickstart example, we use a pattern of random reads and writes, with a block size of 4k and a queue depth of 16.
If no errors are reported in the output then Mayastor has been correctly configured and is operating as expected. You may create and consume additional Persistent Volumes with your own test applications.
This website/page will be End-of-life (EOL) after 31 August 2024. We recommend you to visit OpenEBS Documentation for the latest Mayastor documentation (v2.6 and above).
Mayastor is now also referred to as OpenEBS Replicated PV Mayastor.
The node drain functionality marks the node as unschedulable and then gracefully moves all the volume targets off the drained node. This feature is in line with the node drain functionality of Kubernetes.
To start the drain operation, execute:
kubectl-mayastor drain node <node_name> <label>To get the list of nodes on which the drain operation has been performed, execute:
kubectl-mayastor get drain nodesTo halt the drain operation or to make the node schedulable again, execute:
This website/page will be End-of-life (EOL) after 31 August 2024. We recommend you to visit OpenEBS Documentation for the latest Mayastor documentation (v2.6 and above).
Mayastor is now also referred to as OpenEBS Replicated PV Mayastor.
The Mayastor pool metrics exporter runs as a sidecar container within every io-engine pod and exposes pool usage metrics in Prometheus format. These metrics are exposed on port 9502 using an HTTP endpoint /metrics and are refreshed every five minutes.
When is activated, the stats exporter operates within the obs-callhome-stats container, located in the callhome pod. The statistics are made accessible through an HTTP endpoint at port 9090, specifically using the /stats route.
To install, add the Prometheus-stack helm chart and update the repo.
Then, install the Prometheus monitoring stack and set prometheus.prometheusSpec.serviceMonitorSelectorNilUsesHelmValues to false. This enables Prometheus to discover custom ServiceMonitor for Mayastor.
Next, install the ServiceMonitor resource to select services and specify their underlying endpoint objects.
This website/page will be End-of-life (EOL) after 31 August 2024. We recommend you to visit OpenEBS Documentation for the latest Mayastor documentation (v2.6 and above).
Mayastor is now also referred to as OpenEBS Replicated PV Mayastor.
With the previous versions, the control plane ensured replica redundancy by monitoring all volume targets and checking for any volume targets that were in Degraded state, indicating that one or more replicas of that volume targets were faulty. When a matching volume targets is found, the faulty replica is removed. Then, a new replica is created and added to the volume targets object. As part of adding the new child data-plane, a full rebuild was initiated from one of the existing Online replicas. However, the drawback to the above approach was that even if a replica was inaccessible for a short period (e.g., due to a node restart), a full rebuild was triggered. This may not have a significant impact on replicas with small sizes, but it is not desirable for large replicas.
The partial rebuild feature, overcomes the above problem and helps in achieving faster rebuild times. When volume target encounters IO error on a child/replica, it marks the child as Faulted (removing it from the I/O path) and begins to maintain a write log for all subsequent writes. The Core agent starts a default 10 minute wait for the replica to come back. If the child's replica is online again within timeout, the control-plane requests the volume target to online the child and add it to the IO path along with a partial rebuild process using the aforementioned write log.
The data-plane handles both full and partial replica rebuilds. To view history of the rebuilds that an existing volume target has undergone during its lifecycle until now, you can use the given kubectl command.
To get the output in table format:
To get the output in JSON format:
For example: kubectl mayastor get rebuild-history e898106d-e735-4edf-aba2-932d42c3c58d -ojson
This website/page will be End-of-life (EOL) after 31 August 2024. We recommend you to visit OpenEBS Documentation for the latest Mayastor documentation (v2.6 and above).
Mayastor is now also referred to as OpenEBS Replicated PV Mayastor.
By default, Mayastor collects basic information related to the number and scale of user-deployed instances. The collected data is anonymous and is encrypted at rest. This data is used to understand storage usage trends, which in turn helps maintainers prioritize their contributions to maximize the benefit to the community as a whole.
A summary of the information collected is given below:
The collected information is stored on behalf of the OpenEBS project by DataCore Software Inc. in data centers located in Texas, USA.
To disable collection of usage data or generation of events, the following Helm command, along with the flag, can either be executed during installation or can be re-executed post-installation.
To disable the collection of data metrics from the cluster, add the following flag to the Helm install command.
When eventing is enabled, NATS pods are created to gather various events from the cluster, including statistical metrics such as pools created. To deactivate eventing within the cluster, include the following flag in the Helm installation command.
This section provides an overview of the topology and function of the Mayastor data plane. Developer level documentation is maintained within the project's GitHub repository.
This website/page will be End-of-life (EOL) after 31 August 2024. We recommend you to visit OpenEBS Documentation for the latest Mayastor documentation (v2.6 and above).
Mayastor is now also referred to as OpenEBS Replicated PV Mayastor.
An instance of the mayastor binary running inside a Mayastor container, which is encapsulated by a Mayastor Pod.
Mayastor terminology. A data structure instantiated within a Mayastor instance which performs I/O operations for a single Mayastor volume. Each nexus acts as an NVMe controller for the volume it exports. Logically it is composed chiefly of a 'static' function table which determines its base I/O handling behaviour (held in common with all other nexus of the cluster), combined with configuration information specific to the Mayastor volume it , such as the identity of its . The function of a nexus is to route I/O requests for its exported volume which are received on its host container's target to the underlying persistence layer, via any applied transformations ("data services"), and to return responses to the calling initiator back along that same I/O path.
Mayastor's volume management abstraction. Block devices contributing storage capacity to a Mayastor deployment do so by their inclusion within configured storage pools. Each Mayastor node can host zero or more pools and each pool can "contain" a single base block device as a member. The total capacity of the pool is therefore determined by the size of that device. Pools can only be hosted on nodes running an instance of a mayastor pod.
Multiple volumes can share the capacity of one pool but thin provisioning is not supported. Volumes cannot span multiple pools for the purposes of creating a volume larger in size than could be accommodated by the free capacity in any one pool.
Internally a storage pool is an implementation of an SPDK
A code abstraction of a block-level device to which I/O requests may be sent, presenting a consistent device-independent interface. Mayastor's bdev abstraction layer is based upon that of Intel's (SPDK).
base bdev - Handles I/O directly, e.g. a representation of a physical SSD device
logical volume - A bdev representing an ("lvol bdev")
Mayastor terminology. An lvol bdev (a "logical volume", created within a pool and consuming pool capacity) which is being exported by a Mayastor instance, for consumption by a nexus (local or remote to the exporting instance) as a "child"
Mayastor terminology. A NVMe controller created and owned by a given Nexus and which handles I/O downstream from the nexus' target, by routing it to a replica associated with that child.
A nexus has a minimum of one child, which must be local (local: exported as a replica from a pool hosted by the same mayastor instance as hosts the nexus itself). If the Mayastor volume being exported by the nexus is derived from a StorageClass with a replication factor greater than 1 (i.e. synchronous N-way mirroring is enabled), then the nexus will have additional children, up to the desired number of data copies.
To allow the discovery of, and acceptance of I/O for, a volume by a client initiator, over a Mayastor storage target.
For volumes based on a StorageClass defined as having a replication factor of 1, a single data copy is maintained by Mayastor. The I/O path is largely (entirely, if using malloc:/// pool devices) constrained to within the bounds of a single mayastor instance, which hosts both the volume's nexus and the storage pool in use as its persistence layer.
Each mayastor instance presents a user-space storage target over NVMe-oF TCP. Worker nodes mounting a Mayastor volume for a scheduled application pod to consume are directed by Mayastor's CSI driver implementation to connect to the appropriate transport target for that volume and perform discovery, after which they are able to send I/O to it, directed at the volume in question. Regardless of how many volumes, and by extension how many nexus a mayastor instance hosts, all share the same target instances.
Application I/O received on a target for a volume is passed to the virtual bdev at the front-end of the nexus hosting that volume. In the case of a non-replicated volume, the nexus is composed of a single child, to which the I/O is necessarily routed. As a virtual bdev itself, the child handles the I/O by routing it to the next device, in this case the replica that was created for this child. In non-replicated scenarios, both the volume's nexus and the pool which hosts its replica are co-located within the same mayastor instance, hence the I/O is passed from child to replica using SPDK bdev routines, rather than a network level transport. At the pool layer, a blobstore maps the lvol bdev exported as the replica concerned to the base bdev on which the pool was constructed. From there, other than for malloc:/// devices, the I/O passes to the host kernel via either aio or io_uring, thence via the appropriate storage driver to the physical disk device.
The disk devices' response to the I/O request is returns back along the same path to the caller's initiator.
If the StorageClass on which a volume is based specifies a replication factor of greater than one, then a synchronous mirroring scheme is employed to maintain multiple redundant data copies. For a replicated volume, creation and configuration of the volume's nexus requires additional orchestration steps. Prior to creating the nexus, not only must a local replica be created and exported as for the non-replicated case, but the requisite count of additional remote replicas required to meet the replication factor must be created and exported from Mayastor instances other than that hosting the nexus itself. The control plane core-agent component will select appropriate pool candidates, which includes ensuring sufficient available capacity and that no two replicas are sited on the same Mayastor instance (which would compromise availability during co-incident failures). Once suitable replicas have been successfully exported, the control plane completes the creation and configuration of the volume's nexus, with the replicas as its children. In contrast to their local counterparts, remote replicas are exported, and so connected to by the nexus, over NVMe-F using a user-mode initiator and target implementation from the SPDK.
Write I/O requests to the nexus are handled synchronously; the I/O is dispatched to all (healthy) children and only when completion is acknowledged by all is the I/O acknowledged to the calling initiator via the nexus front-end. Read I/O requests are similarly issued to all children, with just the first response returned to the caller.
This website/page will be End-of-life (EOL) after 31 August 2024. We recommend you to visit OpenEBS Documentation for the latest Mayastor documentation (v2.6 and above).
Mayastor is now also referred to as OpenEBS Replicated PV Mayastor.
2MiB-sized Huge Pages must be supported and enabled on the mayastor storage nodes. A minimum number of 1024 such pages (i.e. 2GiB total) must be available exclusively to the Mayastor pod on each node, which should be verified thus:
If fewer than 1024 pages are available then the page count should be reconfigured on the worker node as required, accounting for any other workloads which may be scheduled on the same node and which also require them. For example:
This change should also be made persistent across reboots by adding the required value to the file/etc/sysctl.conf like so:
If you modify the Huge Page configuration of a node, you MUST either restart kubelet or reboot the node. Mayastor will not deploy correctly if the available Huge Page count as reported by the node's kubelet instance does not satisfy the minimum requirements.
All worker nodes which will have Mayastor pods running on them must be labelled with the OpenEBS engine type "mayastor". This label will be used as a node selector by the Mayastor Daemonset, which is deployed as a part of the Mayastor data plane components installation. To add this label to a node, execute:
If you set csi.node.topology.nodeSelector: true, then you will need to label the worker nodes accordingly to csi.node.topology.segments. Both csi-node and agent-ha-node Daemonsets will include the topology segments into the node selector.
This website/page will be End-of-life (EOL) after 31 August 2024. We recommend you to visit OpenEBS Documentation for the latest Mayastor documentation (v2.6 and above).
Mayastor is now also referred to as OpenEBS Replicated PV Mayastor.
The Mayastor kubectl plugin can be used to view and manage Mayastor resources such as nodes, pools and volumes. It is also used for operations such as scaling the replica count of volumes.
The Mayastor kubectl plugin is available for the Linux platform. The binary for the plugin can be found .
Add the downloaded Mayastor kubectl plugin under $PATH.
To verify the installation, execute:
Sample command to use kubectl plugin:
You can use the plugin with the following options:
All the above resource information can be retrieved for a particular resource using its ID. The command to do so is as follows: kubectl mayastor get <resource_name> <resource_id>
Table is the default output format.
The plugin requires access to the Mayastor REST server for execution. It gets the master node IP from the kube-config file. In case of any failure, the REST endpoint can be specified using the ‘–rest’ flag.
The plugin currently does not have authentication support.
The plugin can operate only over HTTP.
This website/page will be End-of-life (EOL) after 31 August 2024. We recommend you to visit OpenEBS Documentation for the latest Mayastor documentation (v2.6 and above).
Mayastor is now also referred to as OpenEBS Replicated PV Mayastor.
Storage class resource in Kubernetes is used to supply parameters to volumes when they are created. It is a convenient way of grouping volumes with common characteristics. All parameters take a string value. Brief explanation of each supported Mayastor parameter follows.
File system that will be used when mounting the volume. The supported file systems are ext4, xfs and btrfs and the default file system when not specified is ext4. We recommend to use xfs that is considered to be more advanced and performant. Please ensure the requested filesystem driver is installed on all worker nodes in the cluster before using it.
The parameter 'protocol' takes the value nvmf(NVMe over TCP protocol). It is used to mount the volume (target) on the application node.
The string value should be a number and the number should be greater than zero. Mayastor control plane will try to keep always this many copies of the data if possible. If set to one then the volume does not tolerate any node failure. If set to two, then it tolerates one node failure. If set to three, then two node failures, etc.
The volumes can either be thick or thin provisioned. Adding the thin parameter to the StorageClass YAML allows the volume to be thinly provisioned. To do so, add thin: true under the parameters spec, in the StorageClass YAML. When the volumes are thinly provisioned, the user needs to monitor the pools, and if these pools start to run out of space, then either new pools must be added or volumes deleted to prevent thinly provisioned volumes from getting degraded or faulted. This is because when a pool with more than one replica runs out of space, Mayastor moves the largest out-of-space replica to another pool and then executes a rebuild. It then checks if all the replicas have sufficient space; if not, it moves the next largest replica to another pool, and this process continues till all the replicas have sufficient space.
The agents.core.capacity.thin spec present in the Mayastor helm chart consists of the following configurable parameters that can be used to control the scheduling of thinly provisioned replicas:
poolCommitment parameter specifies the maximum allowed pool commitment limit (in percent).
volumeCommitment parameter specifies the minimum amount of free space that must be present in each replica pool in order to create new replicas for an existing volume. This value is specified as a percentage of the volume size.
volumeCommitmentInitial minimum amount of free space that must be present in each replica pool in order to create new replicas for a new volume. This value is specified as a percentage of the volume size.
stsAffinityGroup represents a collection of volumes that belong to instances of Kubernetes StatefulSet. When a StatefulSet is deployed, each instance within the StatefulSet creates its own individual volume, which collectively forms the stsAffinityGroup. Each volume within the stsAffinityGroup corresponds to a pod of the StatefulSet.
This feature enforces the following rules to ensure the proper placement and distribution of replicas and targets so that there isn't any single point of failure affecting multiple instances of StatefulSet.
Anti-Affinity among single-replica volumes : This rule ensures that replicas of different volumes are distributed in such a way that there is no single point of failure. By avoiding the colocation of replicas from different volumes on the same node.
Anti-Affinity among multi-replica volumes :
If the affinity group volumes have multiple replicas, they already have some level of redundancy. This feature ensures that in such cases, the replicas are distributed optimally for the stsAffinityGroup volumes.
Anti-affinity among targets :
The feature ensures that there is no single point of failure for the targets. The stsAffinityGroup ensures that in such cases, the targets are distributed optimally for the stsAffinityGroup volumes.
By default, the stsAffinityGroup feature is disabled. To enable it, modify the storage class YAML by setting the parameters.stsAffinityGroup parameter to true.
cloneFsIdAsVolumeId is a setting for volume clones/restores with two options: true and false. By default, it is set to false.
When set to true, the created clone/restore's filesystem uuid will be set to the restore volume's uuid. This is important because some file systems, like XFS, do not allow duplicate filesystem uuid on the same machine by default.
When set to false, the created clone/restore's filesystem uuid will be same as the orignal volume uuid
This website/page will be End-of-life (EOL) after 31 August 2024. We recommend you to visit OpenEBS Documentation for the latest Mayastor documentation (v2.6 and above).
Mayastor is now also referred to as OpenEBS Replicated PV Mayastor.
Mayastor supports seamless upgrades starting with target version 2.1.0 and later, and source versions 2.0.0 and later. To upgrade from a previous version(1.0.5 or prior) to 2.1.0 or later, visit Legacy Upgrade Support.
From 2.0.x to 2.4.0
To upgrade Mayastor deployment on the Kubernetes cluster, execute:
To view all the available options and sub-commands that can be used with the upgrade command, execute:
To view the status of upgrade, execute:
To view the logs of upgrade job, execute:
This website/page will be End-of-life (EOL) after 31 August 2024. We recommend you to visit OpenEBS Documentation for the latest Mayastor documentation (v2.6 and above).
Mayastor is now also referred to as OpenEBS Replicated PV Mayastor.
Cordoning a node marks or taints the node as unschedulable. This prevents the scheduler from deploying new resources on that node. However, the resources that were deployed prior to cordoning off the node will remain intact.
This feature is in line with the node-cordon functionality of Kubernetes.
To add a label and cordon a node, execute:
kubectl-mayastor cordon node <node_name> <label>To get the list of cordoned nodes, execute:
To view the labels associated with a cordoned node, execute:
In order to make a node schedulable again, execute:
Linux
Distribution:Ubuntu Version: 20.04 LTS Kernel version: 5.13.0-27-generic
Windows
Not supported
helm repo add mayastor https://openebs.github.io/mayastor-extensions/ "mayastor" has been added to your repositorieshelm search repo mayastor --versions NAME CHART VERSION APP VERSION DESCRIPTION
mayastor/mayastor 2.4.0 2.4.0 Mayastor Helm chart for Kuberneteshelm install mayastor mayastor/mayastor -n mayastor --create-namespace --version 2.4.0NAME: mayastor
LAST DEPLOYED: Thu Sep 22 18:59:56 2022
NAMESPACE: mayastor
STATUS: deployed
REVISION: 1
NOTES:
OpenEBS Mayastor has been installed. Check its status by running:
$ kubectl get pods -n mayastor
For more information or to view the documentation, visit our website at https://openebs.io.kubectl get pods -n mayastorNAME READY STATUS RESTARTS AGE
mayastor-agent-core-6c485944f5-c65q6 2/2 Running 0 2m13s
mayastor-agent-ha-node-42tnm 1/1 Running 0 2m14s
mayastor-agent-ha-node-45srp 1/1 Running 0 2m14s
mayastor-agent-ha-node-tzz9x 1/1 Running 0 2m14s
mayastor-api-rest-5c79485686-7qg5p 1/1 Running 0 2m13s
mayastor-csi-controller-65d6bc946-ldnfb 3/3 Running 0 2m13s
mayastor-csi-node-f4fgd 2/2 Running 0 2m13s
mayastor-csi-node-ls9m4 2/2 Running 0 2m13s
mayastor-csi-node-xtcfc 2/2 Running 0 2m13s
mayastor-etcd-0 1/1 Running 0 2m13s
mayastor-etcd-1 1/1 Running 0 2m13s
mayastor-etcd-2 1/1 Running 0 2m13s
mayastor-io-engine-f2wm6 2/2 Running 0 2m13s
mayastor-io-engine-kqxs9 2/2 Running 0 2m13s
mayastor-io-engine-m44ms 2/2 Running 0 2m13s
mayastor-loki-0 1/1 Running 0 2m13s
mayastor-obs-callhome-5f47c6d78b-fzzd7 1/1 Running 0 2m13s
mayastor-operator-diskpool-b64b9b7bb-vrjl6 1/1 Running 0 2m13s
mayastor-promtail-cglxr 1/1 Running 0 2m14s
mayastor-promtail-jc2mz 1/1 Running 0 2m14s
mayastor-promtail-mr8nf 1/1 Running 0 2m14sopenebs/mayastor-extensions : contains components and utilities that provide extended functionalities like ease of installation, monitoring and observability aspects
openebs/mayastor-docs : contains Mayastor's user documenation
kubectl mayastor get rebuild-history {your_volume_UUID} DST SRC STATE TOTAL RECOVERED TRANSFERRED IS-PARTIAL START-TIME END-TIME
b5de71a6-055d-433a-a1c5-2b39ade05d86 0dafa450-7a19-4e21-a919-89c6f9bd2a97 Completed 7MiB 7MiB 0 B true 2023-07-04T05:45:47Z 2023-07-04T05:45:47Z
b5de71a6-055d-433a-a1c5-2b39ade05d86 0dafa450-7a19-4e21-a919-89c6f9bd2a97 Completed 7MiB 7MiB 0 B true 2023-07-04T05:45:46Z 2023-07-04T05:45:46Zkubectl mayastor get rebuild-history {your_volume_UUID} -ojson{
"targetUuid": "c9eb4172-e90c-40ca-9db0-26b2ae372b28",
"records": [
{
"childUri": "nvmf://10.1.0.9:8420/nqn.2019-05.io.openebs:b5de71a6-055d-433a-a1c5-2b39ade05d86?uuid=b5de71a6-055d-433a-a1c5-2b39ade05d86",
"srcUri": "bdev:///0dafa450-7a19-4e21-a919-89c6f9bd2a97?uuid=0dafa450-7a19-4e21-a919-89c6f9bd2a97",
"rebuildJobState": "Completed",
"blocksTotal": 14302,
"blocksRecovered": 14302,
"blocksTransferred": 0,
"blocksRemaining": 0,
"blockSize": 512,
"isPartial": true,
"startTime": "2023-07-04T05:45:47.765932276Z",
"endTime": "2023-07-04T05:45:47.766825274Z"
},
{
"childUri": "nvmf://10.1.0.9:8420/nqn.2019-05.io.openebs:b5de71a6-055d-433a-a1c5-2b39ade05d86?uuid=b5de71a6-055d-433a-a1c5-2b39ade05d86",
"srcUri": "bdev:///0dafa450-7a19-4e21-a919-89c6f9bd2a97?uuid=0dafa450-7a19-4e21-a919-89c6f9bd2a97",
"rebuildJobState": "Completed",
"blocksTotal": 14302,
"blocksRecovered": 14302,
"blocksTransferred": 0,
"blocksRemaining": 0,
"blockSize": 512,
"isPartial": true,
"startTime": "2023-07-04T05:45:46.242015389Z",
"endTime": "2023-07-04T05:45:46.242927463Z"
}
]
}The replicas for a given volume can be either all thick or all thin. Same volume cannot have a combination of thick and thin replicas
nouuiduuidapi-rest
Pod
Hosts the public API REST server
Single
api-rest
Service
Exposes the REST API server
operator-diskpool
Deployment
Hosts DiskPool operator
Single
csi-node
DaemonSet
Hosts CSI Driver node plugin containers
All worker nodes
etcd
StatefulSet
Hosts etcd Server container
Configurable(Recommended: Three replicas)
etcd
Service
Exposes etcd DB endpoint
Single
etcd-headless
Service
Exposes etcd DB endpoint
Single
io-engine
DaemonSet
Hosts Mayastor I/O engine
User-selected nodes
DiskPool
CRD
Declares a Mayastor pool's desired state and reflects its current state
User-defined, one or many
Additional components
metrics-exporter-pool
Sidecar container (within io-engine DaemonSet)
Exports pool related metrics in Prometheus format
All worker nodes
pool-metrics-exporter
Service
Exposes exporter API endpoint to Prometheus
Single
promtail
DaemonSet
Scrapes logs of Mayastor-specific pods and exports them to Loki
All worker nodes
loki
StatefulSet
Stores the historical logs exported by promtail pods
Single
loki
Service
Exposes the Loki API endpoint via ClusterIP
Single
openebs.io/engine=mayastorControl Plane
agent-core
Deployment
Principle control plane actor
Single
csi-controller
Deployment
Hosts Mayastor's CSI controller implementation and CSI provisioner side car
Single
size_mb
Specifies the requested size of the device in MiB
Integer
Mutually exclusive with "num_blocks"
num_blocks
Specifies the requested size of the device in terms of the number of addressable blocks
Integer
Mutually exclusive with "size_mb"
blk_size
Specifies the block size to be reported by the device in bytes
Integer (512 or 4096)
Optional. If not used, block size defaults to 512 bytes
kubectl get pods -n mayastor -l app=etcd -o wideNAME READY STATUS RESTARTS AGE IP NODE NOMINATED NODE READINESS GATES
mayastor-etcd-0 1/1 Running 0 4m9s 10.244.1.212 worker-1 <none> <none>
mayastor-etcd-1 1/1 Running 0 5m16s 10.244.2.219 worker-2 <none> <none>
mayastor-etcd-2 1/1 Running 0 6m28s 10.244.3.203 worker-0 <none> <none>kubectl exec -it mayastor-etcd-0 -n mayastor -- bash
#ETCDCTL_API=3
#etcdctl get --prefix ""kubectl drain worker-0 --ignore-daemonsets --delete-emptydir-datanode/worker-0 cordoned
Warning: ignoring DaemonSet-managed Pods: kube-system/kube-flannel-ds-pbm7r, kube-system/kube-proxy-jgjs4, mayastor/mayastor-agent-ha-node-jkd4c, mayastor/mayastor-csi-node-mb89n, mayastor/mayastor-io-engine-q2n28, mayastor/mayastor-promethues-prometheus-node-exporter-v6mfs, mayastor/mayastor-promtail-6vgvm, monitoring/node-exporter-fz247
evicting pod mayastor/mayastor-etcd-2
evicting pod mayastor/mayastor-agent-core-7c594ff676-2ph69
evicting pod mayastor/mayastor-operator-diskpool-c8ddb588-cgr29
pod/mayastor-operator-diskpool-c8ddb588-cgr29 evicted
pod/mayastor-agent-core-7c594ff676-2ph69 evicted
pod/mayastor-etcd-2 evicted
node/worker-0 drainedext4 and optionally xfs
Helm version must be v3.7 or later.
Each worker node which will host an instance of an io-engine pod must have the following resources free and available for exclusive use by that pod:
Two CPU cores
1GiB RAM
HugePage support
A minimum of 2GiB of 2MiB-sized pages
storage.k8s.ioKubernetes apiextensions.k8s.io API-group resources: CustomResourceDefinition
Mayastor Custom Resources that is openebs.io API-group resources: DiskPool
Custom Resources from Helm chart dependencies of Jaeger that is helpful for debugging:
ConsoleLink Resource from console.openshift.io API group
ElasticSearch Resource from logging.openshift.io API group
Kafka and KafkaUsers from kafka.strimzi.io API group
ServiceMonitor from monitoring.coreos.com API group
Ingress from networking.k8s.io API group and from extensions API group
Route from route.openshift.io API group
All resources from jaegertracing.io API group
Disk(non PCI) with disk-by-guid reference (Best Practice)
Device File
aio:///dev/disk/by-id/ OR uring:///dev/disk/by-id/
Asynchronous Disk(AIO)
Device File
/dev/sdx
Asynchronous Disk I/O (AIO)
Device File
aio:///dev/sdx
io_uring
Device File
uring:///dev/sdx
cat <<EOF | kubectl create -f -
apiVersion: v1
kind: PersistentVolumeClaim
metadata:
  name: ms-volume-claim
spec:
  accessModes:
  - ReadWriteOnce
  resources:
    requests:
      storage: 1Gi
  storageClassName: mayastor-1
EOFapiVersion: v1
kind: PersistentVolumeClaim
metadata:
name: ms-volume-claim
spec:
accessModes:
- ReadWriteOnce
resources:
requests:
storage: 1Gi
storageClassName: INSERT_YOUR_STORAGECLASS_NAME_HEREkubectl-mayastor uncordon node <node_name> <label>disk_pool_committed_size
Gauge
Integer
Committed size of the pool in bytes
volumes_deleted
Guage
Integer
Total successful volume deletion attempts
kubelet_volume_stats_inodes
Gauge
Integer
The total number of inodes
kubelet_volume_stats_inodes_free
Gauge
Integer
The total number of usable inodes.
kubelet_volume_stats_inodes_used
Gauge
Integer
The total number of inodes that have been utilized to store metadata.
disk_pool_total_size_bytes
Gauge
Integer
Total size of the pool
disk_pool_used_size_bytes
Gauge
Integer
Used size of the pool
disk_pool_status
Gauge
Integer
pools_created
Guage
Integer
Total successful pool creation attempts
pools_deleted
Guage
Integer
Total successful pool deletion attempts
volumes_created
Guage
Integer
kubelet_volume_stats_available_bytes
Gauge
Integer
Size of the available/usable volume (in bytes)
kubelet_volume_stats_capacity_bytes
Gauge
Integer
The total size of the volume (in bytes)
kubelet_volume_stats_used_bytes
Gauge
Integer
Status of the pool (0, 1, 2, 3) = {"Unknown", "Online", "Degraded", "Faulted"}
Total successful volume creation attemtps
Used size of the volume (in bytes)
Cluster information
K8s cluster ID: This is a SHA-256 hashed value of the UID of your Kubernetes cluster's kube-system namespace.
K8s node count: This is the number of nodes in your Kubernetes cluster.
Product name: This field displays the name Mayastor
Product version: This is the deployed version of Mayastor.
Deploy namespace: This is a SHA-256 hashed value of the name of the Kubernetes namespace where Mayastor Helm chart is deployed.
Storage node count: This is the number of nodes on which the Mayastor I/O engine is scheduled.
Pool information
Pool count: This is the number of Mayastor DiskPools in your cluster.
Pool maximum size: This is the capacity of the Mayastor DiskPool with the highest capacity.
Pool minimum size: This is the capacity of the Mayastor DiskPool with the lowest capacity.
Pool mean size: This is the average capacity of the Mayastor DiskPools in your cluster.
Pool capacity percentiles: This calculates and returns the capacity distribution of Mayastor DiskPools for the 50th, 75th and the 90th percentiles.
Pools created: This is the number of successful pool creation attempts.
Pools deleted: This is the number of successful pool deletion attempts.
Volume information
Volume count: This is the number of Mayastor Volumes in your cluster.
Volume minimum size: This is the capacity of the Mayastor Volume with the lowest capacity.
Volume mean size: This is the average capacity of the Mayastor Volumes in your cluster.
Volume capacity percentiles: This calculates and returns the capacity distribution of Mayastor Volumes for the 50th, 75th and the 90th percentiles.
Volumes created: This is the number of successful volume creation attempts.
Volumes deleted: This is the number of successful volume deletion attempts.
Replica Information
Replica count: This is the number of Mayastor Volume replicas in your cluster.
Average replica count per volume: This is the average number of replicas each Mayastor Volume has in your cluster.
kubectl mayastor -Vkubectl-plugin 1.0.0kubectl mayastor upgrade -h`Upgrade` the deployment
Usage: kubectl-mayastor upgrade [OPTIONS]
Options:
-d, --dry-run
Display all the validations output but will not execute upgrade
-r, --rest <REST>
The rest endpoint to connect to
-D, --skip-data-plane-restart
If set then upgrade will skip the io-engine pods restart
-k, --kube-config-path <KUBE_CONFIG_PATH>
Path to kubeconfig file
-S, --skip-single-replica-volume-validation
If set then it will continue with upgrade without validating singla replica volume
-R, --skip-replica-rebuild
If set then upgrade will skip the repilca rebuild in progress validation
-C, --skip-cordoned-node-validation
If set then upgrade will skip the cordoned node validation
-o, --output <OUTPUT>
The Output, viz yaml, json [default: none]
-j, --jaeger <JAEGER>
Trace rest requests to the Jaeger endpoint agent
-n, --namespace <NAMESPACE>
Kubernetes namespace of mayastor service, defaults to mayastor [default: mayastor]
-h, --help
Print helpkubectl mayastor get upgrade-statusUpgrade From: 2.0.0
Upgrade To: 2.4.0
Upgrade Status: Successfully upgraded Mayastorkubectl-mayastor get cordon nodeskubectl-mayastor get cordon node <node_name>kubectl-mayastor uncordon node <node_name> <label>
</div>
The above command allows the Kubernetes scheduler to deploy resources on the node.
apiVersion: "openebs.io/v1alpha1"
kind: DiskPool
metadata:
  name: mempool-1
  namespace: mayastor
spec:
  node: worker-node-1
disks: ["malloc:///malloc0?size_mb=64"]apiVersion: "openebs.io/v1alpha1"
kind: DiskPool
metadata:
name: filepool-1
namespace: mayastor
spec:
node: worker-node-1
disks: ["aio:///var/tmp/disk1.img"]apiVersion: "openebs.io/v1alpha1"
kind: DiskPool
metadata:
name: filepool-1
namespace: mayastor
spec:
node: worker-node-1
disks: ["aio:///tmp/disk1.img?blk_size=4096"]truncate -s 1G /tmp/disk1.imgkubectl get pods -n mayastor -l app=etcd -o wideNAME READY STATUS RESTARTS AGE IP NODE NOMINATED NODE READINESS GATES
mayastor-etcd-0 1/1 Running 0 35m 10.244.1.212 worker-1 <none> <none>
mayastor-etcd-1 1/1 Running 0 36m 10.244.2.219 worker-2 <none> <none>
mayastor-etcd-2 0/1 CrashLoopBackOff 5 (44s ago) 10m 10.244.0.121 worker-4 <none> <none>
kubectl edit sts mayastor-etcd -n mayastor - name: ETCD_INITIAL_CLUSTER_STATE
value: existingkubectl exec -it mayastor-etcd-0 -n mayastor -- bash
#ETCDCTL_API=3
#etcdctl get --prefix ""resources:
limits:
cpu: "2"
memory: "1Gi"
hugepages-2Mi: "2Gi"
requests:
cpu: "2"
memory: "1Gi"
hugepages-2Mi: "2Gi"resources:
limits:
cpu: "100m"
memory: "50Mi"
requests:
cpu: "100m"
memory: "50Mi"resources:
limits:
cpu: "32m"
memory: "128Mi"
requests:
cpu: "16m"
memory: "64Mi"resources:
limits:
cpu: "100m"
memory: "64Mi"
requests:
cpu: "50m"
memory: "32Mi"resources:
limits:
cpu: "1000m"
memory: "32Mi"
requests:
cpu: "500m"
memory: "16Mi"resources:
limits:
cpu: "100m"
memory: "32Mi"
requests:
cpu: "50m"
memory: "16Mi"---
apiVersion: v1
kind: ServiceAccount
metadata:
name: {{ .Release.Name }}-service-account
namespace: {{ .Release.Namespace }}
---
kind: ClusterRole
apiVersion: rbac.authorization.k8s.io/v1
metadata:
name: mayastor-cluster-role
rules:
- apiGroups: ["apiextensions.k8s.io"]
resources: ["customresourcedefinitions"]
verbs: ["create", "list"]
# must read diskpool info
- apiGroups: ["datacore.com"]
resources: ["diskpools"]
verbs: ["get", "list", "watch", "update", "replace", "patch"]
# must update diskpool status
- apiGroups: ["datacore.com"]
resources: ["diskpools/status"]
verbs: ["update", "patch"]
# external provisioner & attacher
- apiGroups: [""]
resources: ["persistentvolumes"]
verbs: ["get", "list", "watch", "update", "create", "delete", "patch"]
- apiGroups: [""]
resources: ["nodes"]
verbs: ["get", "list", "watch"]
# external provisioner
- apiGroups: [""]
resources: ["persistentvolumeclaims"]
verbs: ["get", "list", "watch", "update"]
- apiGroups: ["storage.k8s.io"]
resources: ["storageclasses"]
verbs: ["get", "list", "watch"]
- apiGroups: [""]
resources: ["events"]
verbs: ["list", "watch", "create", "update", "patch"]
- apiGroups: ["snapshot.storage.k8s.io"]
resources: ["volumesnapshots"]
verbs: ["get", "list"]
- apiGroups: ["snapshot.storage.k8s.io"]
resources: ["volumesnapshotcontents"]
verbs: ["get", "list"]
- apiGroups: [""]
resources: ["nodes"]
verbs: ["get", "list", "watch"]
# external attacher
- apiGroups: ["storage.k8s.io"]
resources: ["volumeattachments"]
verbs: ["get", "list", "watch", "update", "patch"]
- apiGroups: ["storage.k8s.io"]
resources: ["volumeattachments/status"]
verbs: ["patch"]
# CSI nodes must be listed
- apiGroups: ["storage.k8s.io"]
resources: ["csinodes"]
verbs: ["get", "list", "watch"]
# get kube-system namespace to retrieve Uid
- apiGroups: [""]
resources: ["namespaces"]
verbs: ["get"]
---
kind: ClusterRoleBinding
apiVersion: rbac.authorization.k8s.io/v1
metadata:
name: mayastor-cluster-role-binding
subjects:
- kind: ServiceAccount
name: {{ .Release.Name }}-service-account
namespace: {{ .Release.Namespace }}
roleRef:
kind: ClusterRole
name: mayastor-cluster-role
apiGroup: rbac.authorization.k8s.ioDEVNAME DEVTYPE SIZE AVAILABLE MODEL DEVPATH MAJOR MINOR DEVLINKS
/dev/nvme0n1 disk 894.3GiB yes Dell DC NVMe PE8010 RI U.2 960GB /devices/pci0000:30/0000:30:02.0/0000:31:00.0/nvme/nvme0/nvme0n1 259 0 "/dev/disk/by-id/nvme-eui.ace42e00164f0290", "/dev/disk/by-path/pci-0000:31:00.0-nvme-1", "/dev/disk/by-dname/nvme0n1", "/dev/disk/by-id/nvme-Dell_DC_NVMe_PE8010_RI_U.2_960GB_SDA9N7266I110A814"cat <<EOF | kubectl create -f -
apiVersion: "openebs.io/v1beta1"
kind: DiskPool
metadata:
name: pool-on-node-1
namespace: mayastor
spec:
node: workernode-1-hostname
disks: ["/dev/disk/by-id/<id>"]
EOFapiVersion: "openebs.io/v1beta1"
kind: DiskPool
metadata:
name: INSERT_POOL_NAME_HERE
namespace: mayastor
spec:
node: INSERT_WORKERNODE_HOSTNAME_HERE
disks: ["INSERT_DEVICE_URI_HERE"]kubectl get dsp -n mayastorNAME NODE STATE POOL_STATUS CAPACITY USED AVAILABLE
pool-on-node-1 node-1-14944 Created Online 10724835328 0 10724835328
pool-on-node-2 node-2-14944 Created Online 10724835328 0 10724835328
pool-on-node-3 node-3-14944 Created Online 10724835328 0 10724835328cat <<EOF | kubectl create -f -
apiVersion: storage.k8s.io/v1
kind: StorageClass
metadata:
name: mayastor-1
parameters:
ioTimeout: "30"
protocol: nvmf
repl: "1"
thin: "true"
provisioner: io.openebs.csi-mayastor
EOFcat <<EOF | kubectl create -f -
apiVersion: storage.k8s.io/v1
kind: StorageClass
metadata:
name: mayastor-3
parameters:
ioTimeout: "30"
protocol: nvmf
repl: "3"
thin: "true"
provisioner: io.openebs.csi-mayastor
EOFkubectl apply -f https://raw.githubusercontent.com/openebs/Mayastor/v1.0.2/deploy/fio.yamlkind: Pod
apiVersion: v1
metadata:
name: fio
spec:
nodeSelector:
openebs.io/engine: mayastor
volumes:
- name: ms-volume
persistentVolumeClaim:
claimName: ms-volume-claim
containers:
- name: fio
image: nixery.dev/shell/fio
args:
- sleep
- "1000000"
volumeMounts:
- mountPath: "/volume"
name: ms-volumekubectl get pvc ms-volume-claimNAME STATUS VOLUME CAPACITY ACCESS MODES STORAGECLASS AGE
ms-volume-claim Bound pvc-fe1a5a16-ef70-4775-9eac-2f9c67b3cd5b 1Gi RWO mayastor-1 15skubectl get pv pvc-fe1a5a16-ef70-4775-9eac-2f9c67b3cd5bNAME CAPACITY ACCESS MODES RECLAIM POLICY STATUS CLAIM STORAGECLASS REASON AGE
pvc-fe1a5a16-ef70-4775-9eac-2f9c67b3cd5b 1Gi RWO Delete Bound default/ms-volume-claim mayastor-1 16mkubectl mayastor get volumesID REPLICAS TARGET-NODE ACCESSIBILITY STATUS SIZE
18e30e83-b106-4e0d-9fb6-2b04e761e18a 3 aks-agentpool-12194210-0 nvmf Online 1073741824 kubectl get pod fioNAME READY STATUS RESTARTS AGE
fio 1/1 Running 0 34skubectl exec -it fio -- fio --name=benchtest --size=800m --filename=/volume/test --direct=1 --rw=randrw --ioengine=libaio --bs=4k --iodepth=16 --numjobs=8 --time_based --runtime=60benchtest: (g=0): rw=randrw, bs=(R) 4096B-4096B, (W) 4096B-4096B, (T) 4096B-4096B, ioengine=libaio, iodepth=16
fio-3.20
Starting 1 process
benchtest: Laying out IO file (1 file / 800MiB)
Jobs: 1 (f=1): [m(1)][100.0%][r=376KiB/s,w=340KiB/s][r=94,w=85 IOPS][eta 00m:00s]
benchtest: (groupid=0, jobs=1): err= 0: pid=19: Thu Aug 27 20:31:49 2020
read: IOPS=679, BW=2720KiB/s (2785kB/s)(159MiB/60011msec)
slat (usec): min=6, max=19379, avg=33.91, stdev=270.47
clat (usec): min=2, max=270840, avg=9328.57, stdev=23276.01
lat (msec): min=2, max=270, avg= 9.37, stdev=23.29
clat percentiles (msec):
| 1.00th=[ 3], 5.00th=[ 3], 10.00th=[ 4], 20.00th=[ 4],
| 30.00th=[ 4], 40.00th=[ 4], 50.00th=[ 4], 60.00th=[ 4],
| 70.00th=[ 4], 80.00th=[ 4], 90.00th=[ 7], 95.00th=[ 45],
| 99.00th=[ 136], 99.50th=[ 153], 99.90th=[ 165], 99.95th=[ 178],
| 99.99th=[ 213]
bw ( KiB/s): min= 184, max= 9968, per=100.00%, avg=2735.00, stdev=3795.59, samples=119
iops : min= 46, max= 2492, avg=683.60, stdev=948.92, samples=119
write: IOPS=678, BW=2713KiB/s (2778kB/s)(159MiB/60011msec); 0 zone resets
slat (usec): min=6, max=22191, avg=45.90, stdev=271.52
clat (usec): min=454, max=241225, avg=14143.39, stdev=34629.43
lat (msec): min=2, max=241, avg=14.19, stdev=34.65
clat percentiles (msec):
| 1.00th=[ 3], 5.00th=[ 3], 10.00th=[ 3], 20.00th=[ 3],
| 30.00th=[ 3], 40.00th=[ 3], 50.00th=[ 3], 60.00th=[ 3],
| 70.00th=[ 3], 80.00th=[ 4], 90.00th=[ 22], 95.00th=[ 110],
| 99.00th=[ 155], 99.50th=[ 157], 99.90th=[ 169], 99.95th=[ 197],
| 99.99th=[ 228]
bw ( KiB/s): min= 303, max= 9904, per=100.00%, avg=2727.41, stdev=3808.95, samples=119
iops : min= 75, max= 2476, avg=681.69, stdev=952.25, samples=119
lat (usec) : 4=0.01%, 250=0.01%, 500=0.01%, 750=0.01%, 1000=0.01%
lat (msec) : 2=0.02%, 4=82.46%, 10=7.20%, 20=1.62%, 50=1.50%
lat (msec) : 100=2.58%, 250=4.60%, 500=0.01%
cpu : usr=1.19%, sys=3.28%, ctx=134029, majf=0, minf=17
IO depths : 1=0.1%, 2=0.1%, 4=0.1%, 8=0.1%, 16=100.0%, 32=0.0%, >=64=0.0%
submit : 0=0.0%, 4=100.0%, 8=0.0%, 16=0.0%, 32=0.0%, 64=0.0%, >=64=0.0%
complete : 0=0.0%, 4=100.0%, 8=0.0%, 16=0.1%, 32=0.0%, 64=0.0%, >=64=0.0%
issued rwts: total=40801,40696,0,0 short=0,0,0,0 dropped=0,0,0,0
latency : target=0, window=0, percentile=100.00%, depth=16
Run status group 0 (all jobs):
READ: bw=2720KiB/s (2785kB/s), 2720KiB/s-2720KiB/s (2785kB/s-2785kB/s), io=159MiB (167MB), run=60011-60011msec
WRITE: bw=2713KiB/s (2778kB/s), 2713KiB/s-2713KiB/s (2778kB/s-2778kB/s), io=159MiB (167MB), run=60011-60011msec
Disk stats (read/write):
sdd: ios=40795/40692, merge=0/9, ticks=375308/568708, in_queue=891648, util=99.53%# HELP disk_pool_status disk-pool status
# TYPE disk_pool_status gauge
disk_pool_status{node="worker-0",name="mayastor-disk-pool"} 1
# HELP disk_pool_total_size_bytes total size of the disk-pool in bytes
# TYPE disk_pool_total_size_bytes gauge
disk_pool_total_size_bytes{node="worker-0",name="mayastor-disk-pool"} 5.360320512e+09
# HELP disk_pool_used_size_bytes used disk-pool size in bytes
# TYPE disk_pool_used_size_bytes gauge
disk_pool_used_size_bytes{node="worker-0",name="mayastor-disk-pool"} 2.147483648e+09
# HELP disk_pool_committed_size_bytes Committed size of the pool in bytes
# TYPE disk_pool_committed_size_bytes gauge
disk_pool_committed_size_bytes{node="worker-0", name="mayastor-disk-pool"} 9663676416helm repo add prometheus-community https://prometheus-community.github.io/helm-charts
helm repo updatehelm install mayastor prometheus-community/kube-prometheus-stack -n mayastor --set prometheus.prometheusSpec.serviceMonitorSelectorNilUsesHelmValues=falseapiVersion: monitoring.coreos.com/v1
kind: ServiceMonitor
metadata:
name: mayastor-monitoring
labels:
app: mayastor
spec:
selector:
matchLabels:
app: mayastor
endpoints:
- port: metrics--set obs.callhome.enabled=false--set eventing.enabled=false ____________________________________________________________
| Front-end |
| NVMe-oF |
| (user space) |
|____________________________________________________________|
|
_____________________________v______________________________
| [Nexus] | I/O path |
| | |
| ________V________ |
| | | | |
| | NexusChild | |
| | | |
| |________|_________| |
|_____________________________|______________________________|
|
<loopback>
|
______V________
| Replica |
| (local) |
|==== pool =====|
| |
| +----+ |
| |lvol| |
| +----+ |
|_______________|
|
______V________
| base bdev |
|_______________|
|
V
DISK DEVICE
e.g. /dev/sda _______________________________________________________________ _
| Front-end | |
| NVMe-oF | |
| (user space) | |
|_______________________________________________________________| |
| |
_______________________________|_______________________________ |
| [Nexus] | I/O path | |
| ____________________|____________________ | |
| | | | | |
| ________V________ ________V________ ________V________ | |
| |child 1 | |child 2 | |child 3 | | |
| | | | | | | | |
| | NVMe-oF | | NVMe-oF | | NVMe-oF | | |
| | | | | | | | | Mayastor
| |________|________| |________|________| |________|________| | | Instance
|__________|____________________|____________________|__________| | "A"
| | | |
<network> <loopback> <network> |
| | | |
| ______V________ | |
| | Replica | | |
| | (local) | | |
| |==== pool =====| | |
| | | | |
| | +----+ | | |
| | |lvol| | | |
| | +----+ | | |
| |_______________| | |
| | | |
| ______V________ | |
| | base bdev | | |
| |_______________| | _|
| | |
| V |
| DISK DEVICE | ] Node "A"
| |
| |
| |
| |
______V________ _ ______V________ _
| Replica | | | Replica | |
| (remote) | | | (remote) | |
| nvmf target | | | nvmf target | |
| | | | | |
|==== pool =====| | |==== pool =====| |
| | | Mayastor | | | Mayastor
| +----+ | | Instance | +----+ | | Instance
| |lvol| | | "B" | |lvol| | | "C"
| +----+ | | | +----+ | |
|_______________| | |_______________| |
| | | |
______V________ | ______V________ |
| base bdev | | | base bdev | |
|_______________| _| |_______________| _|
| |
V V
DISK DEVICE ] Node "B" DISK DEVICE ] Node "C"grep HugePages /proc/meminfo
AnonHugePages: 0 kB
ShmemHugePages: 0 kB
HugePages_Total: 1024
HugePages_Free: 671
HugePages_Rsvd: 0
HugePages_Surp: 0
echo 1024 | sudo tee /sys/kernel/mm/hugepages/hugepages-2048kB/nr_hugepagesecho vm.nr_hugepages = 1024 | sudo tee -a /etc/sysctl.confkubectl label node <node_name> openebs.io/engine=mayastorUSAGE:
kubectl-mayastor [OPTIONS] <SUBCOMMAND>
OPTIONS:
-h, --help
Print help information
-j, --jaeger <JAEGER>
Trace rest requests to the Jaeger endpoint agent
-k, --kube-config-path <KUBE_CONFIG_PATH>
Path to kubeconfig file
-n, --namespace <NAMESPACE>
Kubernetes namespace of mayastor service, defaults to mayastor [default: mayastor]
-o, --output <OUTPUT>
The Output, viz yaml, json [default: none]
-r, --rest <REST>
The rest endpoint to connect to
-t, --timeout <TIMEOUT>
Timeout for the REST operations [default: 10s]
-V, --version
Print version information
SUBCOMMANDS:
cordon 'Cordon' resources
drain 'Drain' resources
dump `Dump` resources
get 'Get' resources
help Print this message or the help of the given subcommand(s)
scale 'Scale' resources
uncordon 'Uncordon' resourceskubectl mayastor get volumesID REPLICAS TARGET-NODE ACCESSIBILITY STATUS SIZE
18e30e83-b106-4e0d-9fb6-2b04e761e18a 4 mayastor-1 nvmf Online 10485761
0c08667c-8b59-4d11-9192-b54e27e0ce0f 4 mayastor-2 <none> Online 10485761kubectl mayastor get poolsID TOTAL CAPACITY USED CAPACITY DISKS NODE STATUS MANAGED
mayastor-pool-1 5360320512 1111490560 aio:///dev/vdb?uuid=d8a36b4b-0435-4fee-bf76-f2aef980b833 kworker1 Online true
mayastor-pool-2 5360320512 2172649472 aio:///dev/vdc?uuid=bb12ec7d-8fc3-4644-82cd-dee5b63fc8c5 kworker1 Online true
mayastor-pool-3 5360320512 3258974208 aio:///dev/vdb?uuid=f324edb7-1aca-41ec-954a-9614527f77e1 kworker2 Online false
kubectl mayastor get nodes
ID          GRPC ENDPOINT   STATUS
mayastor-2  10.1.0.7:10124  Online
mayastor-1  10.1.0.6:10124  Online
mayastor-3 10.1.0.8:10124 Onlinekubectl mayastor scale volume <volume_id> <size>Volume 0c08667c-8b59-4d11-9192-b54e27e0ce0f Scaled Successfully 🚀kubectl mayastor -ojson get <resource_type>[{"spec":{"num_replicas":2,"size":67108864,"status":"Created","target":{"node":"ksnode-2","protocol":"nvmf"},"uuid":"5703e66a-e5e5-4c84-9dbe-e5a9a5c805db","topology":{"explicit":{"allowed_nodes":["ksnode-1","ksnode-3","ksnode-2"],"preferred_nodes":["ksnode-2","ksnode-3","ksnode-1"]}},"policy":{"self_heal":true}},"state":{"target":{"children":[{"state":"Online","uri":"bdev:///ac02cf9e-8f25-45f0-ab51-d2e80bd462f1?uuid=ac02cf9e-8f25-45f0-ab51-d2e80bd462f1"},{"state":"Online","uri":"nvmf://192.168.122.6:8420/nqn.2019-05.io.openebs:7b0519cb-8864-4017-85b6-edd45f6172d8?uuid=7b0519cb-8864-4017-85b6-edd45f6172d8"}],"deviceUri":"nvmf://192.168.122.234:8420/nqn.2019-05.io.openebs:nexus-140a1eb1-62b5-43c1-acef-9cc9ebb29425","node":"ksnode-2","rebuilds":0,"protocol":"nvmf","size":67108864,"state":"Online","uuid":"140a1eb1-62b5-43c1-acef-9cc9ebb29425"},"size":67108864,"status":"Online","uuid":"5703e66a-e5e5-4c84-9dbe-e5a9a5c805db"}}]kubectl mayastor get volume-replica-topology <volume_id> ID NODE POOL STATUS CAPACITY ALLOCATED SNAPSHOTS CHILD-STATUS REASON REBUILD
a34dbaf4-e81a-4091-b3f8-f425e5f3689b io-engine-1 pool-1 Online 12MiB 0 B 12MiB <none> <none> <none> kubectl mayastor get volume-snapshots ID TIMESTAMP SOURCE-SIZE ALLOCATED-SIZE TOTAL-ALLOCATED-SIZE SOURCE-VOL
25823425-41fa-434a-9efd-a356b70b5d7c 2023-07-07T13:20:17Z 10MiB 12MiB 12MiB ec4e66fd-3b33-4439-b504-d49aba53da26 kubectl mayastor upgradekubectl logs <upgrade-job-pod-name> -n <mayastor-namespace>This website/page will be End-of-life (EOL) after 31 August 2024. We recommend you to visit for the latest Mayastor documentation (v2.6 and above).
Mayastor is now also referred to as OpenEBS Replicated PV Mayastor.
A legacy installation of Mayastor (1.0.x and below) cannot be seamlessly upgraded and needs manual intervention. Follow the below steps if you wish to upgrade from Mayastor 1.0.x to Mayastor 2.1.0 and above. Mayastor uses etcd as a persistent datastore for its configuration. As a first step, take a snapshot of the etcd. The detailed steps for taking a snapshot can be found in the etcd .
As compared to Mayastor 1.0, the Mayastor 2.0 feature-set introduces breaking changes in some of the components, due to which the upgrade process from 1.0 to 2.0 is not seamless. The list of such changes are given below: ETCD:
Control Plane: The prefixes for control plane have changed from /namespace/$NAMESPACE/control-plane/ to /openebs.io/mayastor/apis/v0/clusters/$KUBE_SYSTEM_UID/namespaces/$NAMESPACE/
Data Plane: The Data Plane nexus information containing a list of healthy children has been moved from $nexus_uuid to /openebs.io/mayastor/apis/v0/clusters/$KUBE_SYSTEM_UID/namespaces/$NAMESPACE/volume/$volume_uuid/nexus/$nexus_uuid/info
RPC:
Control Plane: The RPC for the control plane has been changed from NATS to gRPC.
Data Plane: The registration heartbeat has been changed from NATS to gRPC.
Pool CRDs:
The pool CRDs have been renamed DiskPools (previously, MayastorPools).
In order to start the upgrade process, the following previously deployed components have to be deleted.
To delete the control-plane components, execute:
Next, delete the associated RBAC operator. To do so, execute:
Once all the above components have been successfully removed, fetch the latest helm chart from Mayastor-extension repo and save it to a file, say helm_templates.yaml. To do so, execute:
Next, update the helm_template.yaml file, add the following helm label to all the resources that are being created.
Copy the etcd and io-engine spec from the helm_templates.yaml and save it in two different files say, mayastor_2.0_etcd.yaml and mayastor_io_v2.0.yaml. Once done, remove the etcd and io-engine specs from helm_templates.yaml. These components need to be upgraded separately.
Install the new control-plane components using the helm-templates.yaml file.
Verify the status of the pods. Upon successful deployment, all the pods will be in a running state.
Verify the etcd prefix and compat mode.
Verify if the DiskPools are online.
Next, verify the status of the volumes.
After upgrading control-plane components, the data-plane pods have to be upgraded. To do so, deploy the io-engine DaemonSet from Mayastor's new version.
Using the command given below, the data-plane pods (now io-engine pods) will be upgraded to Mayastor v2.0.
Delete the previously deployed data-plane pods (mayastor-xxxxx). The data-plane pods need to be manually deleted as their update-strategy is set to delete. Upon successful deletion, the new io-engine pods will be up and running.
NATS has been replaced by gRPC for Mayastor versions 2.0 or later. Hence, the NATS components (StatefulSets and services) have to be removed from the cluster.
After control-plane and io-engine, the etcd has to be upgraded. Before starting the etcd upgrade, label the etcd PV and PVCs with helm. Use the below example to create a labels.yaml file. This will be needed to make them helm compatible.
Next, deploy the etcd YAML. To deploy, execute:
Now, verify the etcd space and compat mode, execute:
Once all the components have been upgraded, the HA module can now be enabled via the helm upgrade command.
This concludes the process of legacy upgrade. Run the below commands to verify the upgrade,
kubectl get pods -n mayastorNAME READY STATUS RESTARTS AGE
mayastor-65cxj 1/1 Running 0 9m42s
mayastor-agent-core-7d7f59bbb8-nwptm 2/2 Running 0 104s
mayastor-api-rest-6d774fbdd8-hgrxj 1/1 Running 0 104s mayastor-csi-controller-6469fdf8db-bgs2h 3/3 Running 0 104s
mayastor-csi-node-7zm2v 2/2 Running 0 104s
mayastor-csi-node-gs76x 2/2 Running 0 104s
mayastor-csi-node-mfqfq 2/2 Running 0 104s
mayastor-etcd-0 1/1 Running 0 13m
mayastor-etcd-1 1/1 Running 0 13m
mayastor-etcd-2 1/1 Running 0 13m
mayastor-loki-0 1/1 Running 0 104s
mayastor-mwc9r 1/1 Running 0 9m42s
mayastor-obs-callhome-588688bb4d-w9dl4 1/1 Running 0 104s
mayastor-operator-diskpool-8cd67554d-c4zpz 1/1 Running 0 104s
mayastor-promtail-66cj6 1/1 Running 0 104s
mayastor-promtail-cx9m7 1/1 Running 0 104s
mayastor-promtail-t789g 1/1 Running 0 104s
mayastor-x8vtc 1/1 Running 0 9m42s
nats-0 2/2 Running 0 13m
nats-1 2/2 Running 0 12m
nats-2 2/2 Running 0 12mkubectl exec -it mayastor-etcd-0 -n mayastor -- bash
Defaulted container "etcd" out of: etcd, volume-permissions (init)
I have no name!@mayastor-etcd-0:/opt/bitnami/etcd$ export ETCDCTL_API=3
I have no name!@mayastor-etcd-0:/opt/bitnami/etcd$ etcdctl get --prefix ""LINE NO.3 "mayastor_compat_v1":true - compat mode to look for.
I have no name!@mayastor-etcd-0:/opt/bitnami/etcd$ etcdctl get --prefix ""
/openebs.io/mayastor/apis/v0/clusters/ce05eb25-50cc-400a-a57f-37e6a5ed9bef/namespaces/mayastor/CoreRegistryConfig/db98f8bb-4afc-45d0-85b9-24c99cc443f2
{"id":"db98f8bb-4afc-45d0-85b9-24c99cc443f2","registration":"Automatic","mayastor_compat_v1":true}
/openebs.io/mayastor/apis/v0/clusters/ce05eb25-50cc-400a-a57f-37e6a5ed9bef/namespaces/mayastor/NexusSpec/069feb5e-ec65-4e97-b094-99262dfc9f44
uuid=8929e13f-99c0-4830-bcc2-d4b12a541b97"}},{"Replica":{"uuid":"9455811d-480e-4522-b94a-4352ba65cb73","share_uri":"nvmf://10.20.30.64:8420/nqn.2019-05.io.openebs:9455811d-480e-4522-b94a-4352ba65cb73?uuid=9455811d-480e-4522-b94a-4352ba65cb73"}}],"size":1073741824,"spec_status":{"Created":"Online"},"share":"nvmf","managed":true,"owner":"bf207797-b23d-447a-8d3f-98d378acfa8a","operation":null}
/openebs.io/mayastor/apis/v0/clusters/ce05eb25-50cc-400a-a57f-37e6a5ed9bef/namespaces/mayastor/NodeSpec/worker-0
{"id":"worker-0","endpoint":"10.20.30.56:10124","labels":{}}
/openebs.io/mayastor/apis/v0/clusters/ce05eb25-50cc-400a-a57f-37e6a5ed9bef/namespaces/mayastor/NodeSpec/worker-1
{"id":"worker-1","endpoint":"10.20.30.57:10124","labels":{}}
/openebs.io/mayastor/apis/v0/clusters/ce05eb25-50cc-400a-a57f-37e6a5ed9bef/namespaces/mayastor/NodeSpec/worker-2
{"id":"worker-2","endpoint":"10.20.30.64:10124","labels":{}}
/openebs.io/mayastor/apis/v0/clusters/ce05eb25-50cc-400a-a57f-37e6a5ed9bef/namespaces/mayastor/PoolSpec/pool-0
{"node":"worker-0","id":"pool-0","disks":["/dev/nvme0n1"],"status":{"Created":"Online"},"labels":{"openebs.io/created-by":"operator-diskpool"},"operation":null}
/openebs.io/mayastor/apis/v0/clusters/ce05eb25-50cc-400a-a57f-37e6a5ed9bef/namespaces/mayastor/PoolSpec/pool-1
{"node":"worker-1","id":"pool-1","disks":["/dev/nvme0n1"],"status":{"Created":"Online"},"labels":{"openebs.io/created-by":"operator-diskpool"},"operation":null}
/openebs.io/mayastor/apis/v0/clusters/ce05eb25-50cc-400a-a57f-37e6a5ed9bef/namespaces/mayastor/PoolSpec/pool-2
{"node":"worker-2","id":"pool-2","disks":["/dev/nvme0n1"],"status":{"Created":"Online"},"labels":{"openebs.io/created-by":"operator-diskpool"},"operation":null}
/openebs.io/mayastor/apis/v0/clusters/ce05eb25-50cc-400a-a57f-37e6a5ed9bef/namespaces/mayastor/ReplicaSpec/8929e13f-99c0-4830-bcc2-d4b12a541b97
{"name":"8929e13f-99c0-4830-bcc2-d4b12a541b97","uuid":"8929e13f-99c0-4830-bcc2-d4b12a541b97","size":1073741824,"pool":"pool-1","share":"nvmf","thin":false,"status":{"Created":"online"},"managed":true,"owners":{"volume":"bf207797-b23d-447a-8d3f-98d378acfa8a"},"operation":null}
/openebs.io/mayastor/apis/v0/clusters/ce05eb25-50cc-400a-a57f-37e6a5ed9bef/namespaces/mayastor/ReplicaSpec/9455811d-480e-4522-b94a-4352ba65cb73
{"name":"9455811d-480e-4522-b94a-4352ba65cb73","uuid":"9455811d-480e-4522-b94a-4352ba65cb73","size":1073741824,"pool":"pool-2","share":"nvmf","thin":false,"status":{"Created":"online"},"managed":true,"owners":{"volume":"bf207797-b23d-447a-8d3f-98d378acfa8a"},"operation":null}
/openebs.io/mayastor/apis/v0/clusters/ce05eb25-50cc-400a-a57f-37e6a5ed9bef/namespaces/mayastor/ReplicaSpec/f65d9888-7699-4c44-8ee2-f6aaa58dead0
{"name":"f65d9888-7699-4c44-8ee2-f6aaa58dead0","uuid":"f65d9888-7699-4c44-8ee2-f6aaa58dead0","size":1073741824,"pool":"pool-0","share":"none","thin":false,"status":{"Created":"online"},"managed":true,"owners":{"volume":"bf207797-b23d-447a-8d3f-98d378acfa8a"},"operation":null}
/openebs.io/mayastor/apis/v0/clusters/ce05eb25-50cc-400a-a57f-37e6a5ed9bef/namespaces/mayastor/StoreLeaseLock/CoreAgent/5e6787b9b88cdc5b
/openebs.io/mayastor/apis/v0/clusters/ce05eb25-50cc-400a-a57f-37e6a5ed9bef/namespaces/mayastor/StoreLeaseOwner/CoreAgent
{"kind":"CoreAgent","lease_id":"5e6787b9b88cdc5b","instance_name":"mayastor-agent-core-7d7f59bbb8-nwptm"}
/openebs.io/mayastor/apis/v0/clusters/ce05eb25-50cc-400a-a57f-37e6a5ed9bef/namespaces/mayastor/VolumeSpec/bf207797-b23d-447a-8d3f-98d378acfa8a
{"uuid":"bf207797-b23d-447a-8d3f-98d378acfa8a","size":1073741824,"labels":{"local":"true"},"num_replicas":3,"status":{"Created":"Online"},"policy":{"self_heal":true},"topology":{"node":{"Explicit":{"allowed_nodes":["worker-1","worker-2","master","worker-0"],"preferred_nodes":["worker-2","master","worker-0","worker-1"]}},"pool":{"Labelled":{"exclusion":{},"inclusion":{"openebs.io/created-by":"operator-diskpool"}}}},"last_nexus_id":"069feb5e-ec65-4e97-b094-99262dfc9f44","operation":null,"thin":false,"target":{"node":"worker-0","nexus":"069feb5e-ec65-4e97-b094-99262dfc9f44","protocol":"nvmf","active":true,"config":{"controllerIdRange":{"start":1,"end":65519},"reservationKey":1,"reservationType":"ExclusiveAccess","preemptPolicy":"Holder"},"frontend":{"host_acl":[]}},"publish_context":null,"volume_group":null}
069feb5e-ec65-4e97-b094-99262dfc9f44
{"children":[{"healthy":true,"uuid":"f65d9888-7699-4c44-8ee2-f6aaa58dead0"},{"healthy":true,"uuid":"8929e13f-99c0-4830-bcc2-d4b12a541b97"},{"healthy":true,"uuid":"9455811d-480e-4522-b94a-4352ba65cb73"}],"clean_shutdown":false}
I have no name!@mayastor-etcd-0:/opt/bitnami/etcd$kubectl get dsp -n mayastorNAME NODE STATE POOL_STATUS CAPACITY USED AVAILABLE
pool-0 worker-0 Online Online 374710730752 3221225472 371489505280
pool-1 worker-1 Online Online 374710730752 3221225472 371489505280
pool-2 worker-2 Online Online 374710730752 3221225472 371489505280kubectl mayastor get volumesID REPLICAS TARGET-NODE ACCESSIBILITY STATUS SIZE THIN-PROVISIONED
bf207797-b23d-447a-8d3f-98d378acfa8a 3 worker-0 nvmf Online 1073741824 falsekubectl exec -it mayastor-etcd-0 -n mayastor -- bash
Defaulted container "etcd" out of: etcd, volume-permissions (init)
I have no name!@mayastor-etcd-0:/opt/bitnami/etcd$ export ETCDCTL_API=3
I have no name!@mayastor-etcd-0:/opt/bitnami/etcd$ etcdctl get --prefix ""LINE NO.3 "mayastor_compat_v1":true - compat mode to look for.
I have no name!@mayastor-etcd-0:/opt/bitnami/etcd$ etcdctl get --prefix ""
/openebs.io/mayastor/apis/v0/clusters/ce05eb25-50cc-400a-a57f-37e6a5ed9bef/namespaces/mayastor/CoreRegistryConfig/db98f8bb-4afc-45d0-85b9-24c99cc443f2
{"id":"db98f8bb-4afc-45d0-85b9-24c99cc443f2","registration":"Automatic","mayastor_compat_v1":true}
/openebs.io/mayastor/apis/v0/clusters/ce05eb25-50cc-400a-a57f-37e6a5ed9bef/namespaces/mayastor/NexusSpec/069feb5e-ec65-4e97-b094-99262dfc9f44
uuid=8929e13f-99c0-4830-bcc2-d4b12a541b97"}},{"Replica":{"uuid":"9455811d-480e-4522-b94a-4352ba65cb73","share_uri":"nvmf://10.20.30.64:8420/nqn.2019-05.io.openebs:9455811d-480e-4522-b94a-4352ba65cb73?uuid=9455811d-480e-4522-b94a-4352ba65cb73"}}],"size":1073741824,"spec_status":{"Created":"Online"},"share":"nvmf","managed":true,"owner":"bf207797-b23d-447a-8d3f-98d378acfa8a","operation":null}
/openebs.io/mayastor/apis/v0/clusters/ce05eb25-50cc-400a-a57f-37e6a5ed9bef/namespaces/mayastor/NodeSpec/worker-0
{"id":"worker-0","endpoint":"10.20.30.56:10124","labels":{}}
/openebs.io/mayastor/apis/v0/clusters/ce05eb25-50cc-400a-a57f-37e6a5ed9bef/namespaces/mayastor/NodeSpec/worker-1
{"id":"worker-1","endpoint":"10.20.30.57:10124","labels":{}}
/openebs.io/mayastor/apis/v0/clusters/ce05eb25-50cc-400a-a57f-37e6a5ed9bef/namespaces/mayastor/NodeSpec/worker-2
{"id":"worker-2","endpoint":"10.20.30.64:10124","labels":{}}
/openebs.io/mayastor/apis/v0/clusters/ce05eb25-50cc-400a-a57f-37e6a5ed9bef/namespaces/mayastor/PoolSpec/pool-0
{"node":"worker-0","id":"pool-0","disks":["/dev/nvme0n1"],"status":{"Created":"Online"},"labels":{"openebs.io/created-by":"operator-diskpool"},"operation":null}
/openebs.io/mayastor/apis/v0/clusters/ce05eb25-50cc-400a-a57f-37e6a5ed9bef/namespaces/mayastor/PoolSpec/pool-1
{"node":"worker-1","id":"pool-1","disks":["/dev/nvme0n1"],"status":{"Created":"Online"},"labels":{"openebs.io/created-by":"operator-diskpool"},"operation":null}
/openebs.io/mayastor/apis/v0/clusters/ce05eb25-50cc-400a-a57f-37e6a5ed9bef/namespaces/mayastor/PoolSpec/pool-2
{"node":"worker-2","id":"pool-2","disks":["/dev/nvme0n1"],"status":{"Created":"Online"},"labels":{"openebs.io/created-by":"operator-diskpool"},"operation":null}
/openebs.io/mayastor/apis/v0/clusters/ce05eb25-50cc-400a-a57f-37e6a5ed9bef/namespaces/mayastor/ReplicaSpec/8929e13f-99c0-4830-bcc2-d4b12a541b97
{"name":"8929e13f-99c0-4830-bcc2-d4b12a541b97","uuid":"8929e13f-99c0-4830-bcc2-d4b12a541b97","size":1073741824,"pool":"pool-1","share":"nvmf","thin":false,"status":{"Created":"online"},"managed":true,"owners":{"volume":"bf207797-b23d-447a-8d3f-98d378acfa8a"},"operation":null}
/openebs.io/mayastor/apis/v0/clusters/ce05eb25-50cc-400a-a57f-37e6a5ed9bef/namespaces/mayastor/ReplicaSpec/9455811d-480e-4522-b94a-4352ba65cb73
{"name":"9455811d-480e-4522-b94a-4352ba65cb73","uuid":"9455811d-480e-4522-b94a-4352ba65cb73","size":1073741824,"pool":"pool-2","share":"nvmf","thin":false,"status":{"Created":"online"},"managed":true,"owners":{"volume":"bf207797-b23d-447a-8d3f-98d378acfa8a"},"operation":null}
/openebs.io/mayastor/apis/v0/clusters/ce05eb25-50cc-400a-a57f-37e6a5ed9bef/namespaces/mayastor/ReplicaSpec/f65d9888-7699-4c44-8ee2-f6aaa58dead0
{"name":"f65d9888-7699-4c44-8ee2-f6aaa58dead0","uuid":"f65d9888-7699-4c44-8ee2-f6aaa58dead0","size":1073741824,"pool":"pool-0","share":"none","thin":false,"status":{"Created":"online"},"managed":true,"owners":{"volume":"bf207797-b23d-447a-8d3f-98d378acfa8a"},"operation":null}
/openebs.io/mayastor/apis/v0/clusters/ce05eb25-50cc-400a-a57f-37e6a5ed9bef/namespaces/mayastor/StoreLeaseLock/CoreAgent/5e6787b9b88cdc5b
/openebs.io/mayastor/apis/v0/clusters/ce05eb25-50cc-400a-a57f-37e6a5ed9bef/namespaces/mayastor/StoreLeaseOwner/CoreAgent
{"kind":"CoreAgent","lease_id":"5e6787b9b88cdc5b","instance_name":"mayastor-agent-core-7d7f59bbb8-nwptm"}
/openebs.io/mayastor/apis/v0/clusters/ce05eb25-50cc-400a-a57f-37e6a5ed9bef/namespaces/mayastor/VolumeSpec/bf207797-b23d-447a-8d3f-98d378acfa8a
{"uuid":"bf207797-b23d-447a-8d3f-98d378acfa8a","size":1073741824,"labels":{"local":"true"},"num_replicas":3,"status":{"Created":"Online"},"policy":{"self_heal":true},"topology":{"node":{"Explicit":{"allowed_nodes":["worker-1","worker-2","master","worker-0"],"preferred_nodes":["worker-2","master","worker-0","worker-1"]}},"pool":{"Labelled":{"exclusion":{},"inclusion":{"openebs.io/created-by":"operator-diskpool"}}}},"last_nexus_id":"069feb5e-ec65-4e97-b094-99262dfc9f44","operation":null,"thin":false,"target":{"node":"worker-0","nexus":"069feb5e-ec65-4e97-b094-99262dfc9f44","protocol":"nvmf","active":true,"config":{"controllerIdRange":{"start":1,"end":65519},"reservationKey":1,"reservationType":"ExclusiveAccess","preemptPolicy":"Holder"},"frontend":{"host_acl":[]}},"publish_context":null,"volume_group":null}
069feb5e-ec65-4e97-b094-99262dfc9f44
{"children":[{"healthy":true,"uuid":"f65d9888-7699-4c44-8ee2-f6aaa58dead0"},{"healthy":true,"uuid":"8929e13f-99c0-4830-bcc2-d4b12a541b97"},{"healthy":true,"uuid":"9455811d-480e-4522-b94a-4352ba65cb73"}],"clean_shutdown":false}
I have no name!@mayastor-etcd-0:/opt/bitnami/etcd$helm upgrade --install mayastor . -n mayastor --set etcd.persistence.storageClass="manual" --set loki-stack.loki.persistence.storageClassName="manual" --set agents.ha.enabled="true"Release "mayastor" does not exist. Installing it now.
NAME: mayastor
LAST DEPLOYED: Tue Apr 25 19:20:53 2023
NAMESPACE: mayastor
STATUS: deployed
REVISION: 1
NOTES:
OpenEBS Mayastor has been installed. Check its status by running:
$ kubectl get pods -n mayastorhelm list -n mayastorNAME NAMESPACE REVISION UPDATED STATUS CHART APP VERSION
mayastor mayastor 1 2023-04-25 19:20:53.43928058 +0000 UTC deployed mayastor-2.1.0 2.1.0kubectl get pods -n mayastorNAME READY STATUS RESTARTS AGE
mayastor-agent-core-7d7f59bbb8-nwptm 2/2 Running 0 34m
mayastor-agent-ha-node-fblrn 1/1 Running 0 6m29s
mayastor-agent-ha-node-g6rf9 1/1 Running 0 6m29s
mayastor-agent-ha-node-ktjvz 1/1 Running 0 6m29s
mayastor-api-rest-6d774fbdd8-hgrxj 1/1 Running 0 34m
mayastor-csi-controller-6469fdf8db-bgs2h 3/3 Running 0 34m
mayastor-csi-node-7zm2v 2/2 Running 0 34m
mayastor-csi-node-gs76x 2/2 Running 0 34m
mayastor-csi-node-mfqfq 2/2 Running 0 34m
mayastor-etcd-0 1/1 Running 0 4m7s
mayastor-etcd-1 1/1 Running 0 5m16s
mayastor-etcd-2 1/1 Running 0 6m28s
mayastor-io-engine-6n6bh 2/2 Running 0 25m
mayastor-io-engine-7gpsj 2/2 Running 0 25m
mayastor-io-engine-95jjn 2/2 Running 0 25m
mayastor-loki-0 1/1 Running 0 34m
mayastor-obs-callhome-588688bb4d-w9dl4 1/1 Running 0 34m
mayastor-operator-diskpool-8cd67554d-c4zpz 1/1 Running 0 34m
mayastor-promtail-66cj6 1/1 Running 0 34m
mayastor-promtail-cx9m7 1/1 Running 0 34m
mayastor-promtail-t789g 1/1 Running 0 34m
nats-0 2/2 Running 0 45m
nats-1 2/2 Running 0 45m
nats-2 2/2 Running 0 45mkubectl mayastor get volumesID REPLICAS TARGET-NODE ACCESSIBILITY STATUS SIZE THIN-PROVISIONED
bf207797-b23d-447a-8d3f-98d378acfa8a 3 worker-0 nvmf Online 1073741824 falsekubectl delete deploy core-agents -n mayastor
kubectl delete deploy csi-controller -n mayastor
kubectl delete deploy msp-operator -n mayastor
kubectl delete deploy rest -n mayastor
kubectl delete ds mayastor-csi -n mayastorkubectl delete -f https://raw.githubusercontent.com/openebs/mayastor-control-plane/<version>/deploy/operator-rbac.yamlhelm template mayastor . -n mayastor --set etcd.persistence.storageClass="manual" --set loki-stack.loki.persistence.storageClassName="manual" --set etcd.initialClusterState=existing > helm_templates.yamlmetadata:
annotations:
meta.helm.sh/release-name: $RELEASE_NAME
meta.helm.sh/release-namespace: $RELEASE_NAMESPACE
labels:
app.kubernetes.io/managed-by: Helmkubectl apply -f helm_templates.yaml -n mayastorkubectl apply -f mayastor_io_v2.0.yaml -n mayastorkubectl delete sts nats -n mayastor
kubectl delete svc nats -n mayastormetadata:
annotations:
meta.helm.sh/release-name: mayastor
meta.helm.sh/release-namespace: mayastor
labels:
app.kubernetes.io/managed-by: Helmkubectl patch pvc <data-mayastor-etcd-x> --patch-file labels.yaml n mayastor kubectl patch pv <etcd-volume-x> --patch-file labels.yaml -n mayastorkubectl apply -f mayastor_2.0_etcd.yaml -n mayastorThis website/page will be End-of-life (EOL) after 31 August 2024. We recommend you to visit OpenEBS Documentation for the latest Mayastor documentation (v2.6 and above).
Mayastor is now also referred to as OpenEBS Replicated PV Mayastor.
Currently, we have a cStor cluster as the source, with a clustered MongoDB running as a StatefulSet using cStor volumes.
Run the following command to install Velero:
Verify the Velero namespace for Node Agent and Velero pods:
On the Primary Database (mongo-0) you can see some sample data.
You can also see the data available on the replicated secondary databases.
MongoDB uses replication, and data partitioning (sharding) for high availability and scalability. Taking a backup of the primary database is enough as the data gets replicated to the secondary databases. Restoring both primary and secondary at the same time can cause data corruption.
For reference:
Velero supports two approaches for discovering pod volumes to be backed up using FSB:
Opt-in approach: Annotate pods containing volumes to be backed up.
Opt-out approach: Backup all pod volumes with the ability to opt-out specific volumes.
To ensure that our primary MongoDB pod, which receives writes and replicates data to secondary pods, is included in the backup, we need to annotate it as follows:
To exclude secondary MongoDB pods and their associated Persistent Volume Claims (PVCs) from the backup, we can label them as follows:
Create a backup of the entire namespace. If any other applications run in the same namespace as MongoDB, we can exclude them from the backup using labels or flags from the Velero CLI:
To check the status of the backup using the Velero CLI, you can use the following command. If the backup fails for any reason, you can inspect the logs with the velero backup logs command:
This website/page will be End-of-life (EOL) after 31 August 2024. We recommend you to visit OpenEBS Documentation for the latest Mayastor documentation (v2.6 and above).
Mayastor is now also referred to as OpenEBS Replicated PV Mayastor.
The Mayastor process has been sent the SIGILL signal as the result of attempting to execute an illegal instruction. This indicates that the host node's CPU does not satisfy the prerequisite instruction set level for Mayastor (SSE4.2 on x86-64).
In addition to ensuring that the general prerequisites for installation are met, it is necessary to add the following directory mapping to the services_kublet->extra_binds section of the cluster'scluster.yml file.
If this is not done, CSI socket paths won't match expected values and the Mayastor CSI driver registration process will fail, resulting in the inability to provision Mayastor volumes on the cluster.
If the disk device used by a Mayastor pool becomes inaccessible or enters the offline state, the hosting Mayastor pod may panic. A fix for this behaviour is under investigation.
When rebooting a node that runs applications mounting Mayastor volumes, this can take tens of minutes. The reason is the long default NVMe controller timeout (ctrl_loss_tmo). The solution is to follow the best k8s practices and cordon the node ensuring there aren't any application pods running on it before the reboot. Setting ioTimeout storage class parameter can be used to fine-tune the timeout.
Deploying an application pod on a worker node which hosts Mayastor and Prometheus exporter causes that node to restart. The issue originated because of a kernel bug. Once the nexus disconnects, the entries under /host/sys/class/hwmon/ should get removed, which does not happen in this case(The issue was fixed via this ).
Fix: Use kernel version 5.13 or later if deploying Mayastor in conjunction with the Prometheus metrics exporter.
This website/page will be End-of-life (EOL) after 31 August 2024. We recommend you to visit for the latest Mayastor documentation (v2.6 and above).
Mayastor is now also referred to as OpenEBS Replicated PV Mayastor.
This website/page will be End-of-life (EOL) after 31 August 2024. We recommend you to visit for the latest Mayastor documentation (v2.6 and above).
Mayastor is now also referred to as OpenEBS Replicated PV Mayastor.
Cassandra is a popular NoSQL database used for handling large amounts of data with high availability and scalability. In Kubernetes environments, managing and restoring Cassandra backups efficiently is crucial. In this article, we'll walk you through the process of restoring a Cassandra database in a Kubernetes cluster using Velero, and we'll change the storage class to Mayastor for improved performance.
This website/page will be End-of-life (EOL) after 31 August 2024. We recommend you to visit for the latest Mayastor documentation (v2.6 and above).
Mayastor is now also referred to as OpenEBS Replicated PV Mayastor.
This documentation provides a comprehensive guide on migrating CStor application volumes to Mayastor. We utilize Velero for the backup and restoration process, enabling a seamless transition from a CStor cluster to Mayastor. This example specifically focuses on a GKE cluster.
Velero offers support for the backup and restoration of Kubernetes volumes attached to pods directly from the volume's file system. This is known as File System Backup (FSB) or Pod Volume Backup. The data movement is facilitated through the use of modules from free, open-source backup tools such as Restic (which is the tool of choice in this guide).
For cloud providers, you can find the necessary plugins here.
For detailed Velero GKE configuration prerequisites, refer to this resource.
It's essential to note that Velero requires an object storage bucket for storing backups, and in our case, we use a Google Cloud Storage (GCS) bucket.
For detailed instructions on Velero basic installation, visit https://velero.io/docs/v1.11/basic-install/.
The correct set of log file to collect depends on the nature of the problem. If unsure, then it is best to collect log files for all Mayastor containers. In nearly every case, the logs of all of the control plane component pods will be needed;
csi-controller
core-agent
rest
msp-operator
kubectl -n mayastor get pods -o wideNAME READY STATUS RESTARTS AGE IP NODE NOMINATED NODE READINESS GATES
mayastor-csi-7pg82 2/2 Running 0 15m 10.0.84.131 worker-2 <none> <none>
mayastor-csi-gmpq6 2/2 Running 0 15m 10.0.239.174 worker-1 <none> <none>
mayastor-csi-xrmxx 2/2 Running 0 15m 10.0.85.71 worker-0 <none> <none>
mayastor-qgpw6 1/1 Running 0 14m 10.0.85.71 worker-0 <none> <none>
mayastor-qr84q 1/1 Running 0 14m 10.0.239.174 worker-1 <none> <none>
mayastor-xhmj5 1/1 Running 0 14m 10.0.84.131 worker-2 <none> <none>
... etc (output truncated for brevity)Mayastor containers form the data plane of a Mayastor deployment. A cluster should schedule as many mayastor container instances as required storage nodes have been defined. This log file is most useful when troubleshooting I/O errors however, provisioning and management operations might also fail because of a problem on a storage node.
kubectl -n mayastor logs mayastor-qgpw6 mayastorIf experiencing problems with (un)mounting a volume on an application node, this log file can be useful. Generally all worker nodes in the cluster will be configured to schedule a mayastor CSI agent pod, so it's good to know which specific node is experiencing the issue and inspect the log file only for that node.
kubectl -n mayastor logs mayastor-csi-7pg82 mayastor-csiThese containers implement the CSI spec for Kubernetes and run within the same pods as the csi-controller and mayastor-csi (node plugin) containers. Whilst they are not part of Mayastor's code, they can contain useful information when a Mayastor CSI controller/node plugin fails to register with k8s cluster.
A coredump is a snapshot of process' memory combined with auxiliary information (PID, state of registers, etc.) and saved to a file. It is used for post-mortem analysis and it is generated automatically by the operating system in case of a severe, unrecoverable error (i.e. memory corruption) causing the process to panic. Using a coredump for a problem analysis requires deep knowledge of program internals and is usually done only by developers. However, there is a very useful piece of information that users can retrieve from it and this information alone can often identify the root cause of the problem. That is the stack (backtrace) - a record of the last action that the program was performing at the time when it crashed. Here we describe how to get it. The steps as shown apply specifically to Ubuntu, other linux distros might employ variations.
We rely on systemd-coredump that saves and manages coredumps on the system, coredumpctl utility that is part of the same package and finally the gdb debugger.
If installed correctly then the global core pattern will be set so that all generated coredumps will be piped to the systemd-coredump binary.
If there is a new coredump from the mayastor container, the coredump alone won't be that useful. GDB needs to access the binary of crashed process in order to be able to print at least some information in the backtrace. For that, we need to copy the contents of the container's filesystem to the host.
Now we can start GDB. Don't use the coredumpctl command for starting the debugger. It invokes GDB with invalid path to the debugged binary hence stack unwinding fails for Rust functions. At first we extract the compressed coredump.
Once in GDB we need to set a sysroot so that GDB knows where to find the binary for the debugged program.
After that we can print backtrace(s).
The below behaviour may be encountered while uprading from older releases to Mayastor 2.4 release and above.
Running kubectl get dsp -n mayastor could result in the error due to the v1alpha1 schema in the discovery cache. To resolve this, run the command kubectl get diskpools.openebs.io -n mayastor. After this kubectl discovery cache will be updated with v1beta1 object for dsp.
When creating a Disk Pool with kubectl create -f dsp.yaml, you might encounter an error related to v1alpha1 CR definitions. To resolve this, ensure your CR definition is updated to v1beta1 in the YAML file (for example, apiVersion: openebs.io/v1beta1).
Before you begin, make sure you have the following:
Access to a Kubernetes cluster with Velero installed.
A backup of your Cassandra database created using Velero.
Mayastor configured in your Kubernetes environment.
Set up your Kubernetes cluster credentials for the target cluster where you want to restore your Cassandra database. Use the same values for the BUCKET-NAME and SECRET-FILENAME placeholders that you used during the initial Velero installation. This ensures that Velero has the correct credentials to access the previously saved backups. Use the gcloud command if you are using Google Kubernetes Engine (GKE) as shown below:
Install Velero with the necessary plugins, specifying your backup bucket, secret file, and uploader type. Make sure to replace the placeholders with your specific values:
Confirm that your Cassandra backup is available in Velero. This step ensures that there are no credentials or bucket mismatches:
Check the status of the BackupStorageLocation to ensure it's available:
Create a Velero restore request for your Cassandra backup:
Monitor the progress of the restore operation using the below commands. Velero initiates the restore process by creating an initialization container within the application pod. This container is responsible for restoring the volumes from the backup. As the restore operation proceeds, you can track its status, which typically transitions from in progress to Completed.
In this scenario, the storage class for the PVCs remains as cstor-csi-disk since these PVCs were originally imported from a cStor volume.
Inspect the status of the PVCs in the cassandra namespace:
Create a backup of the Persistent Volume Claims (PVCs) and then modify their storage class to mayastor-single-replica.
Edit the PVC YAML to change the storage class to mayastor-single-replica. You can use the provided example YAML snippet and apply it to your PVCs.
Delete the pending PVCs and apply the modified PVC YAML to recreate them with the new storage class:
Observe the Velero init container as it restores the volumes for the Cassandra pods. This process ensures that your data is correctly recovered.
Run this command to check the restore status:
Run this command to check if all the pods are running:
You can use the following command to access the Cassandra pods. This command establishes a connection to the Cassandra database running on pod cassandra-1:
The query results should display the data you backed up from cStor. In your output, you're expecting to see the data you backed up.
After verifying the data, you can exit the Cassandra shell by typing exit.
Before making changes to the Cassandra StatefulSet YAML, create a backup to preserve the existing configuration by running the following command:
You can modify the Cassandra StatefulSet YAML to change the storage class to mayastor-single-replica. Here's the updated YAML:
Apply the modified YAML to make the changes take effect:
Delete the Cassandra StatefulSet while keeping the pods running without controller management:
Use the kubectl apply command to apply the modified StatefulSet YAML configuration file, ensuring you are in the correct namespace where your Cassandra deployment resides. Replace <path_to_your_yaml> with the actual path to your YAML file.
To check the status of the newly created StatefulSet, run:
To confirm that the pods are running and managed by the controller, run:
kubectl -n mayastor logs $(kubectl -n mayastor get pod -l app=moac -o jsonpath="{.items[0].metadata.name}") csi-attacher
kubectl -n mayastor logs $(kubectl -n mayastor get pod -l app=moac -o jsonpath="{.items[0].metadata.name}") csi-provisionerkubectl -n mayastor logs mayastor-csi-7pg82 csi-driver-registrarsudo apt-get install -y systemd-coredump gdb lz4cat /proc/sys/kernel/core_pattern|/lib/systemd/systemd-coredump %P %u %g %s %t 9223372036854775808 %hcoredumpctl listTIME PID UID GID SIG COREFILE EXE
Tue 2021-03-09 17:43:46 UTC 206366 0 0 6 present /bin/mayastordocker ps | grep mayadata/mayastorb3db4615d5e1 mayadata/mayastor "sleep 100000" 27 minutes ago Up 27 minutes k8s_mayastor_mayastor-n682s_mayastor_51d26ee0-1a96-44c7-85ba-6e50767cd5ce_0
d72afea5bcc2 mayadata/mayastor-csi "/bin/mayastor-csi -…" 7 hours ago Up 7 hours k8s_mayastor-csi_mayastor-csi-xrmxx_mayastor_d24017f2-5268-44a0-9fcd-84a593d7acb2_0mkdir -p /tmp/rootdir
docker cp b3db4615d5e1:/bin /tmp/rootdir
docker cp b3db4615d5e1:/nix /tmp/rootdircoredumpctl info | grep Storage | awk '{ print $2 }'/var/lib/systemd/coredump/core.mayastor.0.6a5e550e77ee4e77a19bd67436ce7a98.64074.1615374302000000000000.lz4sudo lz4cat /var/lib/systemd/coredump/core.mayastor.0.6a5e550e77ee4e77a19bd67436ce7a98.64074.1615374302000000000000.lz4 >coregdb -c core /tmp/rootdir$(readlink /tmp/rootdir/bin/mayastor)GNU gdb (Ubuntu 9.2-0ubuntu1~20.04) 9.2
Copyright (C) 2020 Free Software Foundation, Inc.
License GPLv3+: GNU GPL version 3 or later <http://gnu.org/licenses/gpl.html>
This is free software: you are free to change and redistribute it.
There is NO WARRANTY, to the extent permitted by law.
Type "show copying" and "show warranty" for details.
This GDB was configured as "x86_64-linux-gnu".
Type "show configuration" for configuration details.
For bug reporting instructions, please see:
<http://www.gnu.org/software/gdb/bugs/>.
Find the GDB manual and other documentation resources online at:
<http://www.gnu.org/software/gdb/documentation/>.
For help, type "help".
Type "apropos word" to search for commands related to "word"...
[New LWP 13]
[New LWP 17]
[New LWP 14]
[New LWP 16]
[New LWP 18]
Core was generated by `/bin/mayastor -l0 -nnats'.
Program terminated with signal SIGABRT, Aborted.
#0 0x00007ffdad99fb37 in clock_gettime ()
[Current thread is 1 (LWP 13)]set auto-load safe-path /tmp/rootdir
set sysroot /tmp/rootdirReading symbols from /tmp/rootdir/nix/store/f1gzfqq10dlha1qw10sqvgil34qh30af-systemd-246.6/lib/libudev.so.1...
(No debugging symbols found in /tmp/rootdir/nix/store/f1gzfqq10dlha1qw10sqvgil34qh30af-systemd-246.6/lib/libudev.so.1)
Reading symbols from /tmp/rootdir/nix/store/0kdiav729rrcdwbxws653zxz5kngx8aa-libspdk-dev-21.01/lib/libspdk.so...
Reading symbols from /tmp/rootdir/nix/store/a6rnjp15qgp8a699dlffqj94hzy1nldg-glibc-2.32/lib/libdl.so.2...
(No debugging symbols found in /tmp/rootdir/nix/store/a6rnjp15qgp8a699dlffqj94hzy1nldg-glibc-2.32/lib/libdl.so.2)
Reading symbols from /tmp/rootdir/nix/store/a6rnjp15qgp8a699dlffqj94hzy1nldg-glibc-2.32/lib/libgcc_s.so.1...
(No debugging symbols found in /tmp/rootdir/nix/store/a6rnjp15qgp8a699dlffqj94hzy1nldg-glibc-2.32/lib/libgcc_s.so.1)
Reading symbols from /tmp/rootdir/nix/store/a6rnjp15qgp8a699dlffqj94hzy1nldg-glibc-2.32/lib/libpthread.so.0...
...thread apply all btThread 5 (Thread 0x7f78248bb640 (LWP 59)):
#0 0x00007f7825ac0582 in __lll_lock_wait () from /tmp/rootdir/nix/store/a6rnjp15qgp8a699dlffqj94hzy1nldg-glibc-2.32/lib/libpthread.so.0
#1 0x00007f7825ab90c1 in pthread_mutex_lock () from /tmp/rootdir/nix/store/a6rnjp15qgp8a699dlffqj94hzy1nldg-glibc-2.32/lib/libpthread.so.0
#2 0x00005633ca2e287e in async_io::driver::main_loop ()
#3 0x00005633ca2e27d9 in async_io::driver::UNPARKER::{{closure}}::{{closure}} ()
#4 0x00005633ca2e27c9 in std::sys_common::backtrace::__rust_begin_short_backtrace ()
#5 0x00005633ca2e27b9 in std::thread::Builder::spawn_unchecked::{{closure}}::{{closure}} ()
#6 0x00005633ca2e27a9 in <std::panic::AssertUnwindSafe<F> as core::ops::function::FnOnce<()>>::call_once ()
#7 0x00005633ca2e26b4 in core::ops::function::FnOnce::call_once{{vtable-shim}} ()
#8 0x00005633ca723cda in <alloc::boxed::Box<F,A> as core::ops::function::FnOnce<Args>>::call_once () at /rustc/d1206f950ffb76c76e1b74a19ae33c2b7d949454/library/alloc/src/boxed.rs:1546
#9 <alloc::boxed::Box<F,A> as core::ops::function::FnOnce<Args>>::call_once () at /rustc/d1206f950ffb76c76e1b74a19ae33c2b7d949454/library/alloc/src/boxed.rs:1546
#10 std::sys::unix::thread::Thread::new::thread_start () at /rustc/d1206f950ffb76c76e1b74a19ae33c2b7d949454//library/std/src/sys/unix/thread.rs:71
#11 0x00007f7825ab6e9e in start_thread () from /tmp/rootdir/nix/store/a6rnjp15qgp8a699dlffqj94hzy1nldg-glibc-2.32/lib/libpthread.so.0
#12 0x00007f78259e566f in clone () from /tmp/rootdir/nix/store/a6rnjp15qgp8a699dlffqj94hzy1nldg-glibc-2.32/lib/libc.so.6
Thread 4 (Thread 0x7f7824cbd640 (LWP 57)):
#0 0x00007f78259e598f in epoll_wait () from /tmp/rootdir/nix/store/a6rnjp15qgp8a699dlffqj94hzy1nldg-glibc-2.32/lib/libc.so.6
#1 0x00005633ca2e414b in async_io::reactor::ReactorLock::react ()
#2 0x00005633ca583c11 in async_io::driver::block_on ()
#3 0x00005633ca5810dd in std::sys_common::backtrace::__rust_begin_short_backtrace ()
#4 0x00005633ca580e5c in core::ops::function::FnOnce::call_once{{vtable-shim}} ()
#5 0x00005633ca723cda in <alloc::boxed::Box<F,A> as core::ops::function::FnOnce<Args>>::call_once () at /rustc/d1206f950ffb76c76e1b74a19ae33c2b7d949454/library/alloc/src/boxed.rs:1546
#6 <alloc::boxed::Box<F,A> as core::ops::function::FnOnce<Args>>::call_once () at /rustc/d1206f950ffb76c76e1b74a19ae33c2b7d949454/library/alloc/src/boxed.rs:1546
#7 std::sys::unix::thread::Thread::new::thread_start () at /rustc/d1206f950ffb76c76e1b74a19ae33c2b7d949454//library/std/src/sys/unix/thread.rs:71
#8 0x00007f7825ab6e9e in start_thread () from /tmp/rootdir/nix/store/a6rnjp15qgp8a699dlffqj94hzy1nldg-glibc-2.32/lib/libpthread.so.0
#9 0x00007f78259e566f in clone () from /tmp/rootdir/nix/store/a6rnjp15qgp8a699dlffqj94hzy1nldg-glibc-2.32/lib/libc.so.6
Thread 3 (Thread 0x7f78177fe640 (LWP 61)):
#0 0x00007f7825ac08b7 in accept () from /tmp/rootdir/nix/store/a6rnjp15qgp8a699dlffqj94hzy1nldg-glibc-2.32/lib/libpthread.so.0
#1 0x00007f7825c930bb in socket_listener () from /tmp/rootdir/nix/store/0kdiav729rrcdwbxws653zxz5kngx8aa-libspdk-dev-21.01/lib/libspdk.so
#2 0x00007f7825ab6e9e in start_thread () from /tmp/rootdir/nix/store/a6rnjp15qgp8a699dlffqj94hzy1nldg-glibc-2.32/lib/libpthread.so.0
#3 0x00007f78259e566f in clone () from /tmp/rootdir/nix/store/a6rnjp15qgp8a699dlffqj94hzy1nldg-glibc-2.32/lib/libc.so.6
Thread 2 (Thread 0x7f7817fff640 (LWP 60)):
#0 0x00007f78259e598f in epoll_wait () from /tmp/rootdir/nix/store/a6rnjp15qgp8a699dlffqj94hzy1nldg-glibc-2.32/lib/libc.so.6
#1 0x00007f7825c7f174 in eal_intr_thread_main () from /tmp/rootdir/nix/store/0kdiav729rrcdwbxws653zxz5kngx8aa-libspdk-dev-21.01/lib/libspdk.so
#2 0x00007f7825ab6e9e in start_thread () from /tmp/rootdir/nix/store/a6rnjp15qgp8a699dlffqj94hzy1nldg-glibc-2.32/lib/libpthread.so.0
#3 0x00007f78259e566f in clone () from /tmp/rootdir/nix/store/a6rnjp15qgp8a699dlffqj94hzy1nldg-glibc-2.32/lib/libc.so.6
Thread 1 (Thread 0x7f782559f040 (LWP 56)):
#0 0x00007fff849bcb37 in clock_gettime ()
#1 0x00007f78259af1d0 in clock_gettime@GLIBC_2.2.5 () from /tmp/rootdir/nix/store/a6rnjp15qgp8a699dlffqj94hzy1nldg-glibc-2.32/lib/libc.so.6
#2 0x00005633ca23ebc5 in <tokio::park::either::Either<A,B> as tokio::park::Park>::park ()
#3 0x00005633ca2c86dd in mayastor::main ()
#4 0x00005633ca2000d6 in std::sys_common::backtrace::__rust_begin_short_backtrace ()
#5 0x00005633ca2cad5f in main ()/opt/rke/var/lib/kubelet/plugins:/var/lib/kubelet/pluginsgcloud container clusters get-credentials CLUSTER_NAME --zone ZONE --project PROJECT_NAMEvelero get backup | grep YOUR_BACKUP_NAMEvelero get backup | grep YOUR_BACKUP_NAMEkubectl get backupstoragelocation -n velerovelero restore create RESTORE_NAME --from-backup YOUR_BACKUP_NAMEvelero get restore | grep RESTORE_NAMEkubectl get pvc -n cassandrakubectl get pods -n cassandrakubectl get pvc -n cassandra -o yaml > cassandra_pvc_19-09.yamlls -lrt | grep cassandra_pvc_19-09.yamlapiVersion: v1
items:
- apiVersion: v1
kind: PersistentVolumeClaim
metadata:
finalizers:
- kubernetes.io/pvc-protection
labels:
app.kubernetes.io/instance: cassandra
app.kubernetes.io/name: cassandra
velero.io/backup-name: cassandra-backup-19-09-23
velero.io/restore-name: cassandra-restore-19-09-23
name: data-cassandra-0
namespace: cassandra
spec:
accessModes:
- ReadWriteOnce
resources:
requests:
storage: 3Gi
storageClassName: mayastor-single-replica
volumeMode: Filesystem
- apiVersion: v1
kind: PersistentVolumeClaim
metadata:
finalizers:
- kubernetes.io/pvc-protection
labels:
app.kubernetes.io/instance: cassandra
app.kubernetes.io/name: cassandra
velero.io/backup-name: cassandra-backup-19-09-23
velero.io/restore-name: cassandra-restore-19-09-23
name: data-cassandra-1
namespace: cassandra
spec:
accessModes:
- ReadWriteOnce
resources:
requests:
storage: 3Gi
storageClassName: mayastor-single-replica
volumeMode: Filesystem
- apiVersion: v1
kind: PersistentVolumeClaim
metadata:
finalizers:
- kubernetes.io/pvc-protection
labels:
app.kubernetes.io/instance: cassandra
app.kubernetes.io/name: cassandra
velero.io/backup-name: cassandra-backup-19-09-23
velero.io/restore-name: cassandra-restore-19-09-23
name: data-cassandra-2
namespace: cassandra
spec:
accessModes:
- ReadWriteOnce
resources:
requests:
storage: 3Gi
storageClassName: mayastor-single-replica
volumeMode: Filesystem
kind: List
metadata:
resourceVersion: ""kubectl delete pvc PVC_NAMES -n cassandrakubectl apply -f cassandra_pvc.yaml -n cassandraEvents:
Type Reason Age From Message
---- ------ ---- ---- -------
Warning FailedScheduling 8m37s default-scheduler 0/3 nodes are available: 3 pod has unbound immediate PersistentVolumeClaims. preemption: 0/3 nodes are available: 3 Preemption is not helpful for scheduling.
Warning FailedScheduling 8m36s default-scheduler 0/3 nodes are available: 3 pod has unbound immediate PersistentVolumeClaims. preemption: 0/3 nodes are available: 3 Preemption is not helpful for scheduling.
Warning FailedScheduling 83s default-scheduler 0/3 nodes are available: 3 persistentvolumeclaim "data-cassandra-0" not found. preemption: 0/3 nodes are available: 3 Preemption is not helpful for scheduling.
Warning FailedScheduling 65s default-scheduler running PreFilter plugin "VolumeBinding": %!!(MISSING)w(<nil>)
Normal Scheduled 55s default-scheduler Successfully assigned cassandra/cassandra-0 to gke-mayastor-pool-2acd09ca-4v3z
Normal NotTriggerScaleUp 3m34s (x31 over 8m35s) cluster-autoscaler pod didn't trigger scale-up:
Normal SuccessfulAttachVolume 55s attachdetach-controller AttachVolume.Attach succeeded for volume "pvc-bf8a2fb7-8ddb-4e53-aa48-f8bbf2064b41"
Normal Pulled 47s kubelet Container image "velero/velero-restore-helper:v1.11.1" already present on machine
Normal Created 47s kubelet Created container restore-wait
Normal Started 47s kubelet Started container restore-wait
Normal Pulled 41s kubelet Container image "docker.io/bitnami/cassandra:4.1.3-debian-11-r37" already present on machine
Normal Created 41s kubelet Created container cassandra
Normal Started 41s kubelet Started container cassandravelero get restore | grep cassandra-restore-19-09-23kubectl get pods -n cassandracqlsh -u <enter-your-user-name> -p <enter-your-password> cassandra-1.cassandra-headless.cassandra.svc.cluster.local 9042cassandra@cqlsh> USE openebs;cassandra@cqlsh:openebs> select * from openebs.data; replication | appname | volume
-------------+-----------+--------
3 | cassandra | cStor
(1 rows)kubectl get sts cassandra -n cassandra -o yaml > cassandra_sts_backup.yamlapiVersion: apps/v1
kind: StatefulSet
metadata:
annotations:
meta.helm.sh/release-name: cassandra
meta.helm.sh/release-namespace: cassandra
labels:
app.kubernetes.io/instance: cassandra
app.kubernetes.io/managed-by: Helm
app.kubernetes.io/name: cassandra
helm.sh/chart: cassandra-10.5.3
velero.io/backup-name: cassandra-backup-19-09-23
velero.io/restore-name: cassandra-restore-19-09-23
name: cassandra
namespace: cassandra
spec:
podManagementPolicy: OrderedReady
replicas: 3
revisionHistoryLimit: 10
selector:
matchLabels:
app.kubernetes.io/instance: cassandra
app.kubernetes.io/name: cassandra
serviceName: cassandra-headless
template:
# ... (rest of the configuration remains unchanged)
updateStrategy:
type: RollingUpdate
volumeClaimTemplates:
- apiVersion: v1
kind: PersistentVolumeClaim
metadata:
creationTimestamp: null
labels:
app.kubernetes.io/instance: cassandra
app.kubernetes.io/name: cassandra
name: data
spec:
accessModes:
- ReadWriteOnce
resources:
requests:
storage: 3Gi
storageClassName: mayastor-single-replica # Change the storage class here
volumeMode: Filesystemkubectl apply -f cassandra_sts_modified.yamlkubectl delete sts cassandra -n cassandra --cascade=orphankubectl apply -f <path_to_your_yaml> -n cassandrakubectl get sts -n cassandrakubectl get pods -n cassandraAccess to a Kubernetes cluster with Velero installed.
A backup of your Mongo database created using Velero.
Mayastor configured in your Kubernetes environment.
Install Velero with the GCP provider, ensuring you use the same values for the BUCKET-NAME and SECRET-FILENAME placeholders that you used originally. These placeholders should be replaced with your specific values:
velero install --use-node-agent --provider gcp --plugins velero/velero-plugin-for-gcp:v1.6.0 --bucket BUCKET-NAME --secret-file SECRET-FILENAME --uploader-type resticCustomResourceDefinition/backuprepositories.velero.io: attempting to create resource
CustomResourceDefinition/backuprepositories.velero.io: attempting to create resource client
CustomResourceDefinition/backuprepositories.velero.io: created
CustomResourceDefinition/backups.velero.io: attempting to create resource
CustomResourceDefinition/backups.velero.io: attempting to create resource client
CustomResourceDefinition/backups.velero.io: created
CustomResourceDefinition/backupstoragelocations.velero.io: attempting to create resource
CustomResourceDefinition/backupstoragelocations.velero.io: attempting to create resource client
CustomResourceDefinition/backupstoragelocations.velero.io: created
CustomResourceDefinition/deletebackuprequests.velero.io: attempting to create resource
CustomResourceDefinition/deletebackuprequests.velero.io: attempting to create resource client
CustomResourceDefinition/deletebackuprequests.velero.io: created
CustomResourceDefinition/downloadrequests.velero.io: attempting to create resource
Check the availability of your previously-saved backups. If the credentials or bucket information doesn't match, you won't be able to see the backups:
velero get backup | grep 13-09-23mongo-backup-13-09-23 Completed 0 0 2023-09-13 13:15:32 +0000 UTC 29d default <none>kubectl get backupstoragelocation -n veleroNAME PHASE LAST VALIDATED AGE DEFAULT
default Available 23s 3m32s trueInitiate the restore process using Velero CLI with the following command:
You can check the status of the restore process by using the velero get restore command.
When Velero performs a restore, it deploys an init container within the application pod, responsible for restoring the volume. Initially, the restore status will be InProgress.
Retrieve the current configuration of the PVC which is in Pending status using the following command:
Confirm that the PVC configuration has been saved by checking its existence with this command:
Edit the pvc-mongo.yaml file to update its storage class. Below is the modified PVC configuration with mayastor-single-replica set as the new storage class:
Begin by deleting the problematic PVC with the following command:
Once the PVC has been successfully deleted, you can recreate it using the updated configuration from the pvc-mongo.yaml file. Apply the new configuration with the following command:
After recreating the PVC with Mayastor storageClass, you will observe the presence of a Velero initialization container within the application pod. This container is responsible for restoring the required volumes.
You can check the status of the restore operation by running the following command:
The output will display the pods' status, including the Velero initialization container. Initially, the status might show as "Init:0/1," indicating that the restore process is in progress.
You can track the progress of the restore by running:
You can then verify the data restoration by accessing your MongoDB instance. In the provided example, we used the "mongosh" shell to connect to the MongoDB instance and check the databases and their content. The data should reflect what was previously backed up from the cStor storage.
Due to the statefulset's configuration with three replicas, you will notice that the mongo-1 pod is created but remains in a Pending status. This behavior is expected as we have the storage class set to cStor in statefulset configuration.
Capture the current configuration of the StatefulSet for MongoDB by running the following command:
This command will save the existing StatefulSet configuration to a file named sts-mongo-original.yaml. Next, edit this YAML file to change the storage class to mayastor-single-replica.
Delete the StatefulSet while preserving the pods with the following command:
You can run the following commands to verify the status:
Delete the MongoDB Pod mongod-1.
Delete the Persistent Volume Claim (PVC) for mongod-1.
Recreate the StatefulSet with the Yaml file.
Verify data replication on the secondary database to ensure synchronization.
To install Mayastor using Helm on MicroK8s, execute the following command:
helm install mayastor mayastor/mayastor -n mayastor --create-namespace --set csi.node.kubeletDir="/var/snap/microk8s/common/var/lib/kubelet"NAME: mayastor
LAST DEPLOYED: Thu Sep 22 18:59:56 2022
NAMESPACE: mayastor
STATUS: deployed
REVISION: 1
NOTES:
OpenEBS Mayastor has been installed. Check its status by running:
$ kubectl get pods -n mayastor
For more information or to view the documentation, visit our website at https://openebs.io.During the installation of Mayastor in MicroK8s, Pods with hostnetwork might encounter a known issue where they get stuck in the init state due to the Calico Vxlan bug.
Expected error:
Resolution:
To resolve this error, execute the following command:
For more details about this issue, refer to the GitHub issue.
kubectl get podsNAME READY STATUS RESTARTS AGE
mongo-client-758ddd54cc-h2gwl 1/1 Running 0 47m
mongod-0 1/1 Running 0 47m
mongod-1 1/1 Running 0 44m
mongod-2 1/1 Running 0 42m
ycsb-775fc86c4b-kj5vv 1/1 Running 0 47mkubectl get pvcNAME STATUS VOLUME CAPACITY ACCESS MODES STORAGECLASS AGE
mongodb-persistent-storage-claim-mongod-0 Bound pvc-cb115a0b-07f4-4912-b686-e160e8a0690d 3Gi RWO cstor-csi-disk 54m
mongodb-persistent-storage-claim-mongod-1 Bound pvc-c9214764-7670-4cda-87e3-82f0bc59d8c7 3Gi RWO cstor-csi-disk 52m
mongodb-persistent-storage-claim-mongod-2 Bound pvc-fc1f7ed7-d99e-40c7-a9b7-8d6244403a3e 3Gi RWO cstor-csi-disk 50mkubectl get cvc -n openebsNAME CAPACITY STATUS AGE
pvc-c9214764-7670-4cda-87e3-82f0bc59d8c7 3Gi Bound 53m
pvc-cb115a0b-07f4-4912-b686-e160e8a0690d 3Gi Bound 55m
pvc-fc1f7ed7-d99e-40c7-a9b7-8d6244403a3e 3Gi Bound 50mvelero install --use-node-agent --provider gcp --plugins velero/velero-plugin-for-gcp:v1.6.0 --bucket velero-backup-datacore --secret-file ./credentials-velero --uploader-type restic[Installation progress output]kubectl get pods -n veleroNAME READY STATUS RESTARTS AGE
node-agent-cwkrn 1/1 Running 0 43s
node-agent-qg6hd 1/1 Running 0 43s
node-agent-v6xbk 1/1 Running 0 43s
velero-56c45f5c64-4hzn7 1/1 Running 0 43svelero restore create mongo-restore-13-09-23 --from-backup mongo-backup-13-09-23Restore request "mongo-restore-13-09-23" submitted successfully.
Run `velero restore describe mongo-restore-13-09-23` or `velero restore logs mongo-restore-13-09-23` for more details.velero get restoreNAME BACKUP STATUS STARTED COMPLETED ERRORS WARNINGS CREATED SELECTOR
mongo-restore-13-09-23 mongo-backup-13-09-23 Completed 2023-09-13 13:56:19 +0000 UTC 2023-09-13 14:06:09 +0000 UTC 0 4 2023-09-13 13:56:19 +0000 UTC <none>kubectl apply -f sts-mongo-mayastor.yamlstatefulset.apps/mongod createdkubectl get podsNAME READY STATUS RESTARTS AGE
mongo-client-758ddd54cc-h2gwl 1/1 Running 0 31m
mongod-0 1/1 Running 0 31m
mongod-1 1/1 Running 0 7m54s
mongod-2 1/1 Running 0 6m13s
ycsb-775fc86c4b-kj5vv 1/1 Running 0 31mkubectl mayastor get volumesID REPLICAS TARGET-NODE ACCESSIBILITY STATUS SIZE THIN-PROVISIONED ALLOCATED
f41c2cdc-5611-471e-b5eb-1cfb571b1b87 1 gke-mayastor-pool-2acd09ca-ppxw nvmf Online 3GiB false 3GiB
113882e1-c270-4c72-9c1f-d9e09bfd66ad 1 gke-mayastor-pool-2acd09ca-4v3z nvmf Online 3GiB false 3GiB
fb4d6a4f-5982-4049-977b-9ae20b8162ad 1 gke-mayastor-pool-2acd09ca-q30r nvmf Online 3GiB false 3GiBvelero get restorekubectl get pvc mongodb-persistent-storage-claim-mongod-0 -o yaml > pvc-mongo.yamlls -lrt | grep pvc-mongo.yamlapiVersion: v1
kind: PersistentVolumeClaim
metadata:
finalizers:
- kubernetes.io/pvc-protection
labels:
role: mongo
velero.io/backup-name: mongo-backup-13-09-23
velero.io/restore-name: mongo-restore-13-09-23
name: mongodb-persistent-storage-claim-mongod-0
namespace: default
spec:
accessModes:
- ReadWriteOnce
resources:
requests:
storage: 3Gi
storageClassName: mayastor-single-replica
volumeMode: Filesystemkubectl delete pvc mongodb-persistent-storage-claim-mongod-0kubectl apply -f pvc-mongo.yamlkubectl describe pod <enter_your_pod_name>mongosh mongodb://admin:admin@mongod-0.mongodb-service.default.svc.cluster.local:27017kubectl get sts mongod -o yaml > sts-mongo-original.yamlapiVersion: apps/v1
kind: StatefulSet
metadata:
annotations:
backup.velero.io/backup-volumes: mongodb-persistent-storage-claim
meta.helm.sh/release-name: mongo
meta.helm.sh/release-namespace: default
generation: 1
labels:
app.kubernetes.io/managed-by: Helm
velero.io/backup-name: mongo-backup-13-09-23
velero.io/restore-name: mongo-restore-13-09-23
name: mongod
namespace: default
spec:
podManagementPolicy: OrderedReady
replicas: 3
revisionHistoryLimit: 10
selector:
matchLabels:
role: mongo
serviceName: mongodb-service
template:
metadata:
creationTimestamp: null
labels:
environment: test
replicaset: rs0
role: mongo
spec:
containers:
- command:
- mongod
- --bind_ip
- 0.0.0.0
- --replSet
- rs0
env:
- name: MONGO_INITDB_ROOT_USERNAME
valueFrom:
secretKeyRef:
key: username
name: secrets
- name: MONGO_INITDB_ROOT_PASSWORD
valueFrom:
secretKeyRef:
key: password
name: secrets
image: mongo:latest
imagePullPolicy: Always
lifecycle:
postStart:
exec:
command:
- /bin/sh
- -c
- sleep 90 ; ./tmp/scripts/script.sh > /tmp/script-log
name: mongod-container
ports:
- containerPort: 27017
protocol: TCP
resources: {}
terminationMessagePath: /dev/termination-log
terminationMessagePolicy: File
volumeMounts:
- mountPath: /data/db
name: mongodb-persistent-storage-claim
- mountPath: /tmp/scripts
name: mongo-scripts
dnsPolicy: ClusterFirst
restartPolicy: Always
schedulerName: default-scheduler
securityContext: {}
terminationGracePeriodSeconds: 10
volumes:
- configMap:
defaultMode: 511
name: mongo-replica
name: mongo-scripts
updateStrategy:
type: RollingUpdate
volumeClaimTemplates:
- apiVersion: v1
kind: PersistentVolumeClaim
metadata:
annotations:
volume.beta.kubernetes.io/storage-class: mayastor-single-replica #Make the change here
creationTimestamp: null
name: mongodb-persistent-storage-claim
spec:
accessModes:
- ReadWriteOnce
resources:
requests:
storage: 3Gi
volumeMode: Filesystem
kubectl delete sts mongod --cascade=falsekubectl get stskubectl get podskubectl get pvckubectl delete pod mongod-1kubectl delete pvc mongodb-persistent-storage-claim-mongod-1root@mongod-1:/# mongosh mongodb://admin:admin@mongod-1.mongodb-service.default.svc.cluster.local:27017
Current Mongosh Log ID: 6501c744eb148521b3716af5
Connecting to: mongodb://<credentials>@mongod-1.mongodb-service.default.svc.cluster.local:27017/?directConnection=true&appName=mongosh+1.10.6
Using MongoDB: 7.0.1
Using Mongosh: 1.10.6
For mongosh info see: https://docs.mongodb.com/mongodb-shell/
------
The server generated these startup warnings when booting
2023-09-13T14:19:37.984+00:00: Using the XFS filesystem is strongly recommended with the WiredTiger storage engine. See http://dochub.mongodb.org/core/prodnotes-filesystem
2023-09-13T14:19:38.679+00:00: Access control is not enabled for the database. Read and write access to data and configuration is unrestricted
2023-09-13T14:19:38.679+00:00: You are running this process as the root user, which is not recommended
2023-09-13T14:19:38.679+00:00: vm.max_map_count is too low
------
rs0 [direct: secondary] test> use mydb
switched to db mydb
rs0 [direct: secondary] mydb> db.getMongo().setReadPref('secondary')
rs0 [direct: secondary] mydb> db.accounts.find()
[
{
_id: ObjectId("65019e2f183959fbdbd23f00"),
name: 'john',
total: '1058'
},
{
_id: ObjectId("65019e2f183959fbdbd23f01"),
name: 'jane',
total: '6283'
},
{
_id: ObjectId("65019e31183959fbdbd23f02"),
name: 'james',
total: '472'
}
]
rs0 [direct: secondary] mydb> microk8s kubectl patch felixconfigurations default --patch '{"spec":{"featureDetectOverride":"ChecksumOffloadBroken=true"}}' --type=mergekubectl annotate pod/mongod-0 backup.velero.io/backup-volumes=mongodb-persistent-storage-claimkubectl label pod mongod-1 velero.io/exclude-from-backup=true
pod/mongod-1 labeledkubectl label pod mongod-2 velero.io/exclude-from-backup=true
pod/mongod-2 labeledkubectl label pvc mongodb-persistent-storage-claim-mongod-1 velero.io/exclude-from-backup=true
persistentvolumeclaim/mongodb-persistent-storage-claim-mongod-1 labeledkubectl label pvc mongodb-persistent-storage-claim-mongod-2 velero.io/exclude-from-backup=true
persistentvolumeclaim/mongodb-persistent-storage-claim-mongod-2 labeledvelero backup create mongo-backup-13-09-23 --include-namespaces default --default-volumes-to-fs-backup --waitBackup request "mongo-backup-13-09-23" submitted successfully.
Waiting for backup to complete. You may safely press ctrl-c to stop waiting - your backup will continue in the background.
...........
Backup completed with status: Completed. You may check for more information using the commands `velero backup describe mongo-backup-13-09-23` and `velero backup logs mongo-backup-13-09-23`.velero get backup | grep 13-09-23mongo-backup-13-09-23 Completed 0 0 2023-09-13 13:15:32 +0000 UTC 29d default <none>Mayastor's storage engine supports synchronous mirroring to enhance the durability of data at rest within whatever physical persistence layer is in use. When volumes are provisioned which are configured for replication (a user can control the count of active replicas which should be maintained, on a per StorageClass basis), write I/O operations issued by an application to that volume are amplified by its controller ("nexus") and dispatched to all its active replicas. Only if every replica completes the write successfully on its own underlying block device will the I/O completion be acknowledged to the controller. Otherwise, the I/O is failed and the caller must make its own decision as to whether it should be retried. If a replica is determined to have faulted (I/O cannot be serviced within the configured timeout period, or not without error), the control plane will automatically take corrective action and remove it from the volume. If spare capacity is available within a Mayastor pool, a new replica will be created as a replacement and automatically brought into synchronisation with the existing replicas. The data path for a replicated volume is described in more detail here
This Mayastor documentation contains sections which are focused on initial, 'quickstart' deployment scenarios, including the correct configuration of underlying hardware and software, and of Mayastor features such as "Storage Nodes" (MSNs) and "Disk Pools" (MSPs). Information describing tuning for the optimisation of performance is also provided.
Mayastor has been built to leverage the performance potential of contemporary, high-end, solid state storage devices as a foremost design consideration. For this reason, the I/O path is predicated on NVMe, a transport which is both highly CPU efficient and which demonstrates highly linear resource scaling. The data path runs entirely within user space, also contributing efficiency gains as syscalls are avoided, and is both interrupt and lock free.
MayaData has performed its own benchmarking tests in collaboration with Intel, using latest generation Intel P5800X Optane devices "The World's Fastest Data Centre SSD". In those tests it was determined that, on average, across a range of read/write ratios and both with and without synchronous mirroring enabled, the overhead imposed by the Mayastor I/O path was well under 10% (in fact, much closer to 6%).
Further information regarding the testing performed may be found here
Mayastor makes use of parts of the open source Storage Performance Development Kit (SPDK) project, contributed by Intel. Mayastor's Storage Pools use the SPDK's Blobstore structure as their on-disk persistence layer. Blobstore structures and layout are documented.
Since the replicas (data copies) of Mayastor volumes are held entirely within Blobstores, it is not possible to directly access the data held on pool's block devices from outside of Mayastor. Equally, Mayastor cannot directly 'import' and use existing volumes which aren't of Mayastor origin. The project's maintainers are considering alternative options for the persistence layer which may support such data migration goals.
The size of a Mayastor Pool is fixed at the time of creation and is immutable. A single pool may have only one block device as a member. These constraints may be removed in later versions.
The replica placement logic of Mayastor's control plane doesn't permit replicas of the same volume to be placed onto the same node, even if it were to be within different Disk Pools. For example, if a volume with replication factor 3 is to be provisioned, then there must be three healthy Disk Pools available, each with sufficient free capacity and each located on its own Mayastor node. Further enhancements to topology awareness are under consideration by the maintainers.
The Mayastor kubectl plugin is used to obtain this information.
No. This may be a feature of future releases.
Mayastor does not peform asynchronous replication.
Mayastor pools do not implement any form of RAID, erasure coding or striping. If higher levels of data redundancy are required, Mayastor volumes can be provisioned with a replication factor of greater than 1, which will result in synchronously mirrored copies of their data being stored in multiple Disk Pools across multiple Storage Nodes. If the block device on which a Disk Pool is created is actually a logical unit backed by its own RAID implementation (e.g. a Fibre Channel attached LUN from an external SAN) it can still be used within a Mayastor Disk Pool whilst providing protection against physical disk device failures.
No.
No but these may be features of future releases.
Mayastor nightly builds and releases are compiled and tested on x86-64, under Ubuntu 20.04 LTS with a 5.13 kernel. Some effort has been made to allow compilation on ARM platforms but this is currently considered experimental and is not subject to integration or end-to-end testing by Mayastor's maintainers.
Minimum hardware requirements are discussed in the quickstart section of this documentation.
Mayastor does not run on Raspbery Pi as the version of the SPDK used by Mayastor requires ARMv8 Crypto extensions which are not currently available for Pi.
Mayastor, as any other solution leveraging TCP for network transport, may suffer from network congestion as TCP will try to slow down transfer speeds. It is important to keep an eye on networking and fine-tune TCP/IP stack as appropriate. This tuning can include (but is not limited to) send and receive buffers, MSS, congestion control algorithms (e.g. you may try DCTCP) etc.
Mayastor has been designed so as to be able to leverage the peformance capabilities of contemporary high-end solid-state storage devices. A significant aspect of this is the selection of a polling based I/O service queue, rather than an interrupt driven one. This minimises the latency introduced into the data path but at the cost of additional CPU utilisation by the "reactor" - the poller operating at the heart of the Mayastor pod. When Mayastor pods have been deployed to a cluster, it is expected that these daemonset instances will make full utilization of their CPU allocation, even when there is no I/O load on the cluster. This is simply the poller continuing to operate at full speed, waiting for I/O. For the same reason, it is recommended that when configuring the CPU resource limits for the Mayastor daemonset, only full, not fractional, CPU limits are set; fractional allocations will also incur additional latency, resulting in a reduction in overall performance potential. The extent to which this performance degradation is noticeable in practice will depend on the performance of the underlying storage in use, as well as whatvever other bottlenecks/constraints may be present in the system as cofigured.
The supportability tool generates support bundles, which are used for debugging purposes. These bundles are created in response to the user's invocation of the tool and can be transmitted only by the user. To view the list of collected information, visit the supportability section.
In Kubernetes, when a PVC is created with the reclaim policy set to 'Retain', the PV bound to this PVC is not deleted even if the PVC is deleted. One can manually delete the PV by issuing the command "kubectl delete pv ", however the underlying storage resources could be left behind as the CSI volume provisioner (external provisioner) is not aware of this. To resolve this issue of dangling storage objects, Mayastor has introduced a PV garbage collector. This PV garbage collector is deployed as a part of the Mayastor CSI controller-plugin.
The PV garbage collector deploys a watcher component, which subscribes to the Kubernetes Persistent Volume deletion events. When a PV is deleted, an event is generated by the Kubernetes API server and is received by this component. Upon a successful validation of this event, the garbage collector deletes the corresponding Mayastor volume resources.
To disbale cow for btrfs filesystem, use nodatacow as a mountOption in the storage class which would be used to provision the volume.
In the current setup, we have a CStor cluster serving as the source, with Cassandra running as a StatefulSet, utilizing CStor volumes.
kubectl get pods -n cassandra NAME READY STATUS RESTARTS AGE
cassandra-0 1/1 Running 0 6m22s
cassandra-1 1/1 Running 0 4m23s
cassandra-2 1/1 Running 0 2m15skubectl get pvc -n cassandra NAME STATUS VOLUME CAPACITY ACCESS MODES STORAGECLASS AGE
data-cassandra-0 Bound pvc-05c464de-f273-4d04-b915-600bc434d762 3Gi RWO cstor-csi-disk 6m37s
data-cassandra-1 Bound pvc-a7ac4af9-6cc9-4722-aee1-b8c9e1c1f8c8 3Gi RWO cstor-csi-disk 4m38s
data-cassandra-2 Bound pvc-0980ea22-0b4b-4f02-bc57-81c4089cf55a 3Gi RWO cstor-csi-disk 2m30skubectl get cvc -n openebs NAME CAPACITY STATUS AGE
pvc-05c464de-f273-4d04-b915-600bc434d762 3Gi Bound 6m47s
pvc-0980ea22-0b4b-4f02-bc57-81c4089cf55a 3Gi Bound 2m40s
pvc-a7ac4af9-6cc9-4722-aee1-b8c9e1c1f8c8 3Gi Bound 4m48sTo initiate Velero, execute the following command:
Verify the Velero namespace for Node Agent and Velero pods:
In this example, we create a new database with sample data in Cassandra, a distributed database.
The data is distributed across all replication instances.
Cassandra is a distributed wide-column store database running in clusters called rings. Each node in a Cassandra ring stores some data ranges and replicates others for scaling and fault tolerance. To back up Cassandra, we must back up all three volumes and restore them at the destination.
Velero offers two approaches for discovering pod volumes to back up using File System Backup (FSB):
Opt-in Approach: Annotate every pod containing a volume to be backed up with the volume's name.
Opt-out Approach: Back up all pod volumes using FSB, with the option to exclude specific volumes.
Opt-in:
In this case, we opt-in all Cassandra pods and volumes for backup:
To perform the backup, run the following command:
Check the backup status, run the following command:
This website/page will be End-of-life (EOL) after 31 August 2024. We recommend you to visit for the latest Mayastor documentation (v2.6 and above).
Mayastor is now also referred to as OpenEBS Replicated PV Mayastor.
This documentation outlines the process of migrating application volumes from CStor to Mayastor. We will leverage Velero for backup and restoration, facilitating the transition from a CStor cluster to a Mayastor cluster. This example specifically focuses on a Google Kubernetes Engine (GKE) cluster.
Velero Support: Velero supports the backup and restoration of Kubernetes volumes attached to pods through File System Backup (FSB) or Pod Volume Backup. This process involves using modules from popular open-source backup tools like Restic (which we will utilize).
velero install --use-node-agent --provider gcp --plugins velero/velero-plugin-for-gcp:v1.6.0 --bucket velero-backup-datacore --secret-file ./credentials-velero --uploader-type restickubectl get pods -n velerokubectl -n cassandra annotate pod/cassandra-0 backup.velero.io/backup-volumes=data
kubectl -n cassandra annotate pod/cassandra-1 backup.velero.io/backup-volumes=data
kubectl -n cassandra annotate pod/cassandra-2 backup.velero.io/backup-volumes=datavelero backup create cassandra-backup-19-09-23 --include-namespaces cassandra --default-volumes-to-fs-backup --waitvelero get backup | grep cassandra-backup-19-09-23For cloud provider plugins, refer to the Velero Docs - Providers section.
Velero GKE Configuration (Prerequisites): You can find the prerequisites and configuration details for Velero in a Google Kubernetes Engine (GKE) environment on the GitHub here.
Object Storage Requirement: To store backups, Velero necessitates an object storage bucket. In our case, we utilize a Google Cloud Storage (GCS) bucket. Configuration details and setup can be found on the GitHub here.
Velero Basic Installation: For a step-by-step guide on the basic installation of Velero, refer to the .
This website/page will be End-of-life (EOL) after 31 August 2024. We recommend you to visit OpenEBS Documentation for the latest Mayastor documentation (v2.6 and above).
Mayastor is now also referred to as OpenEBS Replicated PV Mayastor.
Once provisioned, neither Mayastor Disk Pools nor Mayastor Volumes can be re-sized. A Mayastor Pool can have only a single block device as a member. Mayastor Volumes are exclusively thick-provisioned.
Mayastor has no snapshot or cloning capabilities.
Mayastor Volumes can be configured (or subsequently re-configured) to be composed of 2 or more "children" or "replicas"; causing synchronously mirrored copies of the volumes's data to be maintained on more than one worker node and Disk Pool. This contributes additional "durability" at the persistence layer, ensuring that viable copies of a volume's data remain even if a Disk Pool device is lost.
A Mayastor volume is currently accessible to an application only via a single target instance (NVMe-oF) of a single Mayastor pod. However, if that Mayastor pod ceases to run (through the loss of the worker node on which it's scheduled, execution failure, crashloopbackoff etc.) the detects the failure and moves the target to a healthy worker node to ensure I/O continuity.